The experienced detectorists at Minelab have put together a comprehensive list of FAQs on how to use a metal detector. These also contain many pro tips for metal detecting.
You may find the answers to your questions by reading the FAQs here and from the related Knowledge Base Articles. Of course, if, after searching through this information you still have a question, there please contact our customer service team.
네, 미넬랩 금속 탐지기는 다양한 종류의 목표물을 ' 구별 '할 수 있는 기능을 갖추고 있습니다. 미넬랩 탐지기의 판별 기능은 목표물의 두 가지 특성, 즉 철의 특성과 전도성 을 측정합니다.
철 함량은 탐지 대상에 포함된 철의 양, 즉 자석에 얼마나 강하게 끌리는지를 나타냅니다. 철 성분이 많은 대상은 대개 쓸모없는 물건이기 때문에 금속 탐지기는 철 함량만으로 이러한 대상을 구분하거나 걸러낼 수 있습니다. 전도성은 탐지 대상이 전기를 얼마나 잘 전도하는지, 즉 금속 탐지기의 자기장에 얼마나 잘 반응하는지를 나타냅니다. 못이나 알루미늄 호일 같은 쓸모없는 물건은 동전이나 반지 같은 귀중한 물건과는 전도성이 다릅니다. 이 경우 금속 탐지기는 전도성을 기준으로 탐지 대상이 쓸모없는 물건인지 아닌지를 판단할 수 있습니다.
Minelab 탐지기 제품군은 종류에 따라 판별 설정 구성 과정과 보물 또는 쓰레기를 표시하는 방식이 다릅니다.
일반적으로 탐지기의 주파수가 낮을수록 땅속 깊이 탐지할 수 있습니다. 하지만 낮은 주파수에서는 작고 전도성이 낮은 목표물에 대한 감도가 떨어집니다. 반대로 주파수가 높을수록 작은 목표물에 대한 감도는 높아지지만, 깊이 탐지하는 능력은 떨어집니다. 일반적으로 금 탐지기는 작은 금덩어리를 찾기 위해 높은 주파수에서 작동하고, 동전이나 보물 탐지기는 더 깊이 탐지하기 위해 낮은 주파수에서 작동합니다. 다만 MPS 방식의 금속 탐지기는 감도와 깊이 탐지 능력을 동시에 갖춘 예외적인 경우입니다.
크기
금속 탐지기의 탐색 코일 크기는 탐지 깊이 또는 감도에 영향을 미칠 수 있습니다. 코일이 클수록 더 깊이 탐지할 수 있지만 작은 목표물에 대한 감도는 떨어집니다. 반대로 탐색 코일의 직경이 작을수록 감도는 높아지지만 탐지 깊이는 줄어듭니다.
크기가 작은 코일은 가볍고 조종하기 쉬우며, 험난한 지형이나 덤불 속을 헤쳐나가는 데 유리합니다. 또한 쓰레기가 많은 지역에서도 장점이 있습니다.
모양
가장 일반적인 코일 형태는 기존의 원형 코일, 타원형 코일, 그리고 개방형 웹 코일입니다. 코일 형태가 달라지는 주된 이유는 물리적 요구 사항을 충족하기 위해서입니다. 예를 들어, 타원형 코일은 원형 코일보다 덤불이나 바위 사이로 쉽게 밀어 넣을 수 있고, 개방형 웹 코일은 물속에서 더 쉽게 움직이며 무게도 가볍습니다. 기존의 원형 코일은 일반적으로 더 안정적이고 성능이 뛰어나며, 특히 금 탐사에 많이 사용됩니다.
구성
가장 일반적인 코일 권선 방식에는 동심형, 이중 D형, 모노루프형 세 가지가 있습니다. 이 세 가지 코일 방식의 차이점은 탐색 코일 내부에 전선이 감기는 패턴입니다.
동심 코일
동심 코일은 안쪽 원과 바깥쪽 원에 각각 전선이 감겨 있습니다. 탐색 패턴은 원뿔형이며 목표물의 위치를 정확하게 파악하는 데 유용합니다. 동심 코일은 광물 함량이 높은 토양에서 잡음이 더 많이 발생하며, 지면 전체를 꼼꼼하게 탐색하려면 스캔 범위를 더 넓게 중첩해야 합니다.
더블 D 코일
더블 D 코일은 대부분의 탐지 작업에 선호되는 코일입니다. 이 코일은 지면을 더욱 균일하게 커버하는 칼날 또는 끌 모양의 신호를 생성하며, 작업자가 신호에 익숙해지면 매우 정확한 위치 탐지가 가능합니다. 또한 더블 D 코일은 뛰어난 지면 균형 유지 능력 때문에 선호됩니다.
모노루프 코일
모노루프 코일은 코일 둘레에 한 가닥의 전선만 감겨 있으며, 이 전선이 송수신 모두에 사용됩니다. 모노루프 코일의 신호 패턴은 원뿔형이므로 더 많은 중첩이 필요합니다. 광물질 함량이 매우 높은 토양에서는 접지 균형을 맞추기가 더 어려울 수 있지만, 일반적으로 더블-D 코일보다 수신 깊이가 약간 더 깊습니다.
먼지, 흙, 습기가 스키드플레이트 내부에 쌓이면 오작동 신호와 성능 저하를 초래할 수 있습니다. 미넬랩 탐지기의 최적 성능을 유지하려면 스키드플레이트를 정기적으로 청소하는 것이 좋습니다.
코일 선택 가이드 를 확인하여 감지 요구에 가장 적합한 코일을 찾으십시오.
금속 탐지기의 오디오 회로가 하이파이 음질을 제공하지 않기 때문에 헤드폰 사양은 금속 탐지기에 그다지 중요하지 않습니다. 예를 들어, 저희 탐지기의 주파수 출력 범위는 약 75~1200Hz에 불과합니다.
당사의 오디오 회로는 16옴에서 100옴 이상의 대부분의 헤드폰을 구동할 수 있습니다.
오디오 최적화는 사람마다 듣는 방식이 다르기 때문에 매우 주관적인 문제입니다.
저희는 불필요한 기술 사양으로 고객을 혼란스럽게 하지 않으려고 노력합니다. 왜냐하면 실제로 어떤 헤드폰이 자신에게 가장 적합한지 판단하는 가장 좋은 방법은 직접 사용해 보는 것이기 때문입니다.
CTX 3030과 같이 오디오 톤을 조절할 수 있는 탐지기를 사용하는 경우, 탐지 톤이 사용자의 청력에 최적화되도록 시간을 투자하는 것이 좋습니다.
이 질문에 대한 명확한 답은 없습니다. 목표물의 크기, 방향, 금속 함량, 지표 광물 및 전도율, 해당 지역의 전기 및 주변 소음 등 여러 요인에 따라 달라지기 때문입니다.
하지만 흔히 GPX 시리즈 탐지기가 3피트, 때로는 4피트 깊이에서 큰 금덩어리를 발견하고, CTX 3030이 12인치 이상 깊이에서 동전과 반지를 발견했다는 이야기를 듣습니다.
고장이 날 경우에만요.
일부 탐지기에서는 지면 균형 조정이 전혀 필요하지 않습니다. 하지만 탐지 경험이 부족한 사용자에게는 지면 균형 추적 기능을 사용하는 것이 좋습니다.
추적 모드에서는 탐지기가 자동으로 지면 균형을 맞춰주며, 지면의 광물 구성이 변하더라도 균형을 유지합니다. X-TERRA 305 및 X-TERRA 505와 같은 수동 지면 균형 탐지기의 경우, 매번 탐색을 시작할 때 지면 균형을 맞춰야 하며, 필요에 따라 주기적으로 다시 균형을 맞춰야 합니다. 지면 균형은 항상 금속 물체가 없는 깨끗한 지면에서 수행하십시오.
금 목걸이는 탐지하기가 매우 어렵습니다. 특히 아주 가는 목걸이일수록 더욱 그렇습니다. 목걸이의 각 고리는 매우 작아서 탐지기가 각각의 고리를 별개의 목표물로 인식하기 때문에 쉽게 놓칠 수 있습니다. 목걸이 고리보다 훨씬 큰 잠금장치나 펜던트는 탐지될 가능성이 더 높습니다. 유레카 골드(Eureka Gold)나 탐사 모드에서 18.75kHz 코일을 사용하는 X-TERRA 705와 같은 고주파 탐지기는 대부분의 동전 탐지기보다 가는 목걸이를 더 잘 탐지할 수 있습니다.
콜라는 탄소로 이루어져 있어 동전처럼 전도성이 매우 높습니다.
GPZ 7000은 모든 지반 조건에서 가장 깊이 탐지할 수 있는 탐지기로, 광물 함량이 높은 암석도 투과하여 탐지할 수 있습니다.
아니요, 케이블 특성은 제조 과정에서 코일 권선에 맞춰져 있으므로 케이블을 연장하면 코일의 성능이 저하됩니다.
코일 크기가 작을수록 여러 목표물을 동시에 탐지하는 경우가 줄어들기 때문에 쓰레기가 많은 지역에 더 적합합니다. 일반적으로 동심형 코일이 이러한 이유로 더블-D 코일보다 더 좋습니다.
탐지 작업에 가장 적합한 코일을 찾으려면 코일 선택 가이드를 참조하십시오.
금속 탐지기는 땅속 금속 물체에서 발생하는 전자기 신호를 감지합니다. 이와 유사한 신호는 전력선, 라디오 송신기, 발전기 등과 같은 다른 전자기 발생원으로부터도 공기를 통해 수신될 수 있습니다.
탐지 중에 탐지기가 시끄럽다가 코일 스캔을 멈추면 조용해진다면, 광물질이 함유된 토양에서 신호를 수신하고 있는 것입니다. 접지 밸런스를 수행한 후 탐지를 계속하십시오.
GPX 시리즈만 해당: 여전히 잡음이 심하면 다른 토양/타이밍 설정을 시도해 보세요. 기타 모든 탐지기: 여전히 잡음이 심하면 감도를 가장 안정적인 최고 감도 수준으로 낮춰야 합니다.
모든 유용한 목표물을 확실하게 찾아내는 유일한 방법은 판별 기능을 사용하지 않는 것입니다. 하지만 모든 목표물을 파헤치는 것은 많은 시간을 낭비하게 만듭니다. 판별 패턴은 항상 유용한 목표물을 최대한 많이 찾아내는 것과 쓸모없는 목표물을 대부분 무시하는 것 사이의 절충안입니다.
이는 여러 가지 원인에 의해 발생할 수 있습니다.
보통 스윙 끝에서 코일을 들어 올리기 때문입니다. 항상 스윙 전체 구간에서 천천히, 낮게, 수평으로 쓸어주세요.
무전압 전송(ZVT) 기술은 매우 일정한 고출력의 반대 극성 자기장을 생성합니다.
ZVT는 사용자에게 탁월한 지면 균형 기능을 제공하여 광물질이 함유된 토양에서 탐지기의 안정성을 향상시키며, 현재 모든 경쟁사 제품을 능가하는 극심한 깊이에서 금덩이를 탐지할 수 있습니다.
GPZ 7000은 광물 함량이 높거나 지형이 고르지 않은 환경에서도 중간 크기에서 큰 금덩어리를 탐지하는 데 최고의 성능을 발휘합니다. 다른 어떤 탐지기보다 뛰어난 심도 탐지 능력을 유지하면서도, 더 작고 얕은 목표물에 대한 감도 또한 우수합니다.
GPZ 7000 탐지기는 Minelab 정품 코일과 시중에서 판매되는 호환 코일을 사용할 수 있습니다. Minelab 정품 코일은 Minelab 공인 대리점에서 구입 가능하며, 14인치 또는 19인치 Super-D 코일을 선택할 수 있습니다.
NuggetFinder는 Minelab에서 승인한 두 가지 애프터마켓 코일을 출시했습니다. 12인치 원형 Super-D 코일과 17인치 타원형 Super-D 코일이며, NuggetFinder 판매점에서 구매할 수 있습니다.
아니요, GPZ 7000에는 식별 기능이 없습니다.
'험지 유형' 설정은 기본 설정이며, 금은 일반적으로 광물 함량이 높은 토양 지역에서 발견되므로 권장됩니다.
일반 지형 설정은 가장 깊은 탐지 깊이를 제공하지만, 토양 내 광물화 정도가 낮은 "안정적인" 토양에서만 사용할 수 있습니다.
탐지기가 "일반" 접지 유형을 사용할 때 불안정하게 작동하거나 잡음이 심하게 발생하는 경우 "어려움" 접지 유형으로 변경해야 합니다.
극한 지반 유형은 가장 낮은 탐지 깊이를 제공하며, 광물 함량이 매우 높은 지역에서만 사용해야 합니다. 이 설정은 "어려운" 지반 유형 설정을 사용할 때 코일을 지면 위로 들어 올려야 하는 경우에만 사용해야 합니다.
접지 밸런싱 시, 노란색 페라이트 링은 GPZ 7000의 접지 밸런싱 정확도를 향상시키는 데 도움이 되는 추가 데이터를 인위적으로 제공합니다. 원활한 작동을 위해 항상 이 기능을 사용해야 합니다. 접지 밸런싱을 위해 코일을 노란색 페라이트 링 위로 8자 모양으로 움직여 주십시오. 이때 8자 모양으로 움직일 때마다 노란색 페라이트 링 위를 지나가도록 해야 합니다.
균형이 제대로 맞춰지면 노란색 페라이트 링 위로 코일을 움직일 때 부드러운 소리가 들려야 합니다.
GPZ 7000의 지면 균형을 맞출 때는 코일을 좌우로 흔들거나 8자 모양으로 움직이는 것이 좋습니다. GPZ 7000은 토양 변화를 지속적으로 감지하기 때문입니다. 지면 균형을 맞출 때는 코일을 최대한 넓은 지면에 대고 움직여야 하며, 특히 좌우로 흔들거나 8자 모양으로 움직일 때마다 노란색 페라이트 링 위를 지나가도록 해야 합니다. 이렇게 하면 탐지기가 주변 지면 상태에 대한 정보를 최대한 많이 얻을 수 있어 더욱 정확한 지면 균형을 맞출 수 있습니다.
무선 오디오는 신호가 차단될 경우 오디오 끊김 현상이 발생할 수 있습니다. WM12와 탐지기 사이에 직접적인 시야를 확보하면 오디오 끊김 현상을 줄일 수 있습니다. WM12를 탐지기에 최대한 가까이 착용하는 것이 가장 좋습니다. 이렇게 하면 무선 송신기까지의 경로가 최소화되고, 사용자의 신체가 WM12와 탐지기 사이의 신호 경로를 차단할 가능성이 줄어듭니다.
GPZ 7000은 배터리가 완전히 충전된 상태에서 시동을 걸면 약 8시간 동안 작동합니다. 배터리 충전에는 일반적으로 5~6시간이 소요됩니다.
WM12 무선 모듈은 완전히 충전된 배터리로 약 12시간 동안 작동하며, BC10 충전기를 사용하여 충전할 경우 약 12시간이 소요됩니다.
네, GPZ 7000은 일반적인 24V 배터리 시스템으로 충전할 수 있습니다. BC10 충전기는 11~30V DC 범위에서 작동합니다.
차량에 인버터가 장착되어 있는 경우, 제공된 240V AC 플러그 팩을 사용할 수도 있습니다.
아니요, Minelab은 현재 교체형 배터리 셀이나 알칼리 배터리 팩을 출시할 계획이 없습니다.
GPZ 7000 제품 상자에는 USB 케이블이 두 개 들어 있습니다. USB-A-미니 USB 케이블은 WM12 무선 모듈 충전에 사용됩니다.
USB-A-USB-B 변환 케이블은 소프트웨어 업데이트에 사용되며, 스크린 포드 뒷면과 PC에 연결됩니다.
스크린 포드 뒷면에는 소프트웨어 업그레이드가 출시될 경우 사용할 수 있는 USB-B 포트가 있습니다. 업데이트는 당사 웹사이트의 GPZ 7000 페이지 다운로드 섹션에서 확인하십시오.
GeoSense-PI™ 기술은 지상 신호를 매우 명확하고 정확하게 분석하고 응답하므로 한 번 감지할 수 없다고 생각했던 어려운 환경에서도 감지할 수 있습니다. 가장 작은 금 조각도 초고속으로 감지하기 위해 3개의 중첩 피드백 시스템을 통해 원치 않는 신호를 빠르게 억제합니다.
GPX 6000은 광물이 많이 함유된 땅이나 변하기 쉬운 땅에서도 더 많은 작은 너겟에서 최고의 성능을 발휘합니다. 더 크고 깊은 너겟에서 GPZ 7000 바로 뒤에서 뛰어난 깊이를 유지합니다.
GPX 6000 코일은 이전 GPX 시리즈 감지기와 호환되지 않는 새로운 범위의 경량 고성능 코일입니다.
GPX 6000의 14" Double-D 코일은 EMI 제거 또는 전도성 토양 신호 제거에만 사용할 수 있습니다. 철 식별이 불가능합니다.
현재 GPX 6000과 함께 사용할 수 있는 Minelab 코일은 다음과 같습니다.
Minelab에서 승인한 애프터마켓 코일은 Coiltek과 NuggetFinder에서 구입할 수 있습니다.
코일에서 코일 케이블의 첫 번째 권선은 항상 샤프트 위로 가야 합니다. 그런 다음 코일 케이블을 샤프트 주위에 단단히 감고 두 개의 벨크로 스트랩으로 제자리에 고정해야 합니다. 감지 시 코일이 자유롭게 움직일 수 있도록 충분한 공간을 확보해야 합니다.
GPX 6000은 지면의 페라이트 성분을 추적하지 않습니다. GeoSense-PI는 다른 기술을 사용하여 운영자에게 보이지 않는 'X' 응답을 제거합니다.
GPX 6000의 접지 균형을 맞추기 위해 노란색 페라이트가 필요하지 않습니다.
임계값 톤은 Ground Type 버튼을 길게 눌러 모든 감도 설정에서 켜고 끌 수 있습니다.
임계값 톤은 수동 감도 범위에서 켜지고 자동 감도 범위에서 꺼집니다. 다음에 GPX 6000을 켜면 임계값 톤이 기본값으로 돌아갑니다.
어려운 지반 유형 설정은 특히 뜨거운 암석이나 매우 가변적인 지반과 함께 더 많이 광물화된 토양에서 가장 잘 사용됩니다.
일반 접지 유형 설정은 더 큰 너깃에서 가장 깊이가 있습니다. 가능한 한 항상 광물화 수준이 낮거나 가변성이 적은 지반에서 사용하는 것이 가장 좋습니다. 노멀 그라운드 타입은 뜨거운 암석을 타겟으로 잡을 수 있습니다. 뜨거운 암석이 균형을 이룰 수 없는 경우에는 어려운 접지 유형 설정을 사용해야 합니다.
GeoSense-PI가 탑재된 GPX 6000은 지면을 지속적으로 추적하므로 두 가지 방법 모두 효과적입니다. Minelab은 가장 빠른 지면 균형 조정을 위해 Quick-Trak 버튼을 누른 상태에서 GPX 6000을 지면 위에서 위아래로 흔드는 것을 권장합니다.
전도성 접지는 눈에 보이는 소금과 연관될 필요가 없습니다. 예를 들어, 최근의 비는 토양을 더 전도성으로 만들고 원치 않는 전도성 토양 응답을 증가시킬 수 있습니다.
무선 오디오는 신호가 차단될 때 오디오 드롭아웃에 취약합니다. 오디오 드롭아웃은 헤드폰과 감지기 사이의 직접적인 가시선을 확보하여 줄일 수 있습니다. 블루투스 컨트롤이 감지기에 가장 가까운 헤드폰을 착용하는 것이 가장 좋습니다. 이렇게 하면 Bluetooth 송신기에 대한 경로가 최소화되고 작업자의 몸이 헤드폰과 감지기 사이의 신호 경로를 차단할 가능성이 줄어듭니다.
GPX 6000은 완전히 충전된 배터리를 시작할 때 약 8시간 동안 작동합니다. 배터리를 충전하는 데 일반적으로 5~6시간이 걸립니다.
ML 100 헤드폰은 완전히 충전된 배터리로 약 24시간 동안 작동하며 충전하는 데 약 3.5시간이 걸립니다.
GPX 6000 배터리는 차량에서 충전할 때 공칭 12V 차량용 배터리 시스템에서만 충전해야 합니다.
Minelab은 현재 교체 가능한 셀 또는 알카라인 배터리 팩을 출시할 계획이 없습니다.
USB 케이블은 Bluetooth 헤드폰을 충전하는 데 사용되며 GPX 6000에 대한 소프트웨어 업그레이드가 가능한 경우에 사용됩니다.
스피커 그릴 뒤에는 소프트웨어 업그레이드가 출시될 때 사용할 수 있는 USB 포트가 있습니다. 업데이트에 대해서는 당사 웹사이트 에서 GPX 6000 페이지 의 다운로드 섹션을 확인하십시오.
주어진 위치에 어떤 수준의 토양 광물화가 있을 것인지 예측할 수 없으므로 시작하는 것이 권장되는 시기는 보통입니다. 그런 다음 감지기가 코일을 스위핑하고 임계값의 안정성을 들어 어떤 타이밍을 사용할지 알려줄 수 있습니다.
Auto Tune 및 Ground Balance를 수행한 후에는 검색을 시작해야 합니다. 감지기가 너무 시끄럽거나 뜨거운 암석이 많은 신호를 보내는 경우 사용 중인 타이밍이 현재 있는 지면에 대해 너무 공격적입니다. 아래 스케일의 어두운 끝 부분에 더 가까운 다른 타이밍을 선택해야 합니다(예: Enhance).
GPX 5000은 특히 폭풍우가 치는 날씨에 전자기 간섭(EMI)을 겪는 것으로 알려져 있습니다. 이 간섭에 대한 세 가지 알려진 이유가 있습니다.
EMI가 좋지 않은 날에는 임계값을 푸르르게 유지할 수 있는 몇 가지 팁이 있습니다.
코일 Rx 스위치가 취소로 설정된 모노루프 코일을 사용하고 있지 않은지 확인하십시오.
Monoloop 코일은 완벽하게 둥근 케이블을 가지고 있습니다.
Double-D 코일은 2개의 내부 코어로 인해 케이블이 더 평평합니다.
코일/수신 스위치를 취소에 둡니다. 예상보다 깊이가 약간 줄어들었다면 코일은 Double-D입니다. 깊이가 거의 없다면 모노루프 코일이 있는 것입니다.
안정기 기능은 임계값의 미세한 변화가 들리기 시작하는 지점을 제어합니다. 이러한 희미한 변화는 주변 잡음 또는 희미한 목표 신호일 수 있습니다. 스태빌라이저 컨트롤을 높이면 희미한 타겟 신호가 더 커지지만 노이즈 레벨도 증가하여 원하는 타겟 신호를 잠재적으로 숨길 수 있습니다. 안정기를 사용하면 이러한 희미한 변화를 마스킹하여 완벽하게 안정적인 임계값을 제공하여 희미한 표적 신호를 식별하는 능력을 향상시킬 수 있습니다.
안정기는 해당 위치의 토양 조건이 결정될 때까지 FP(공장 사전 설정) 위치에 두는 것이 가장 좋습니다. 로컬 조건에 대해 Rx 게인 레벨이 설정되고 다른 오디오 설정이 선택되면 안정기를 사용하여 임계값 안정성을 미세 조정할 수 있습니다.
안정기의 최적 위치를 찾으려면 코일이 지면을 가로질러 스위핑되는지 확인하십시오. 임계값이 채터링을 시작하는 지점 아래의 한 숫자가 일반적으로 가장 좋은 설정입니다.
Stabilizer의 효과는 Rx Gain 컨트롤과 비슷한 효과를 낸다고 볼 수 있습니다. 그러나 Stabilizer는 오디오 처리에만 영향을 미치고 수신(Rx) 신호를 변경하지 않으므로 최종 단계의 미세 조정으로 사용해야 합니다. 스태빌라이저를 조정한 후 접지 조건이 변경되거나 코일을 변경하려는 경우 Rx 게인을 재설정해야 할 수 있지만 그렇게 하기 전에 먼저 스태빌라이저를 공장 사전 설정으로 되돌리십시오. 이렇게 하면 조건에 가장 적합한 Rx 게인 레벨을 선택한 다음 스태빌라이저를 사용하여 미세 조정할 수 있습니다.
팁: 스태빌라이저 컨트롤을 최소값(시계 반대 방향)에 가깝게 돌리면 임계값이 매우 안정적이지만 더 작은 대상에 대한 민감도를 많이 잃게 됩니다. 이것은 쓰레기가 많은 지역에서 큰 덩어리를 찾거나 GPX 5000 및 GPX 4800을 사용하여 동전이나 보물을 찾는 것과 같은 특정 시나리오에서 바람직한 기능일 수 있습니다.
팁: 이러한 컨트롤을 설정하는 가장 좋은 순서는 다음과 같습니다.
타겟 볼륨은 타겟 신호의 강도를 제어하며 8보다 높은 설정에서는 임계값의 볼륨도 약간 증가합니다. 이것은 바람이 많이 부는 조건, 청력 손실로 고통받는 사람들 또는 외부 스피커를 사용할 때 유용합니다. 리튬 이온 배터리 팩에 내장된 오디오 앰프를 사용하여 스피커를 배터리에 직접 연결하고 Target Volume을 사용하여 적절한 증폭 레벨을 설정할 수 있습니다. 헤드폰에서 외부 스피커로 전환할 때 임계값 및 볼륨 제한 컨트롤을 약간 조정해야 할 수 있습니다.
Target Volume은 조용한 조건에서 오디오 부스트로 사용할 수 있으며 광물질이 많이 함유된 토양에서 그라운드 노이즈 신호를 줄이거나 부드럽게 하는 데에도 사용할 수 있습니다. 이것은 강력한 기능이며 스태빌라이저 컨트롤과 함께 작동하여 궁극의 미세 조정 기능을 제공합니다. 다양한 조건에서 최적의 조합을 찾으려면 약간의 실험이 필요할 수 있습니다.
참고: 코일 또는 위치 변경으로 인해 게인 조정이 필요할 때마다 먼저 대상 볼륨이 FP 설정으로 돌아가도록 하십시오. 그런 다음 새 조건에 맞게 미세 조정할 수 있습니다.
SDC 2300은 소형 방수형 금 탐사 탐지기입니다. 다중 주기 고속(MPF) 펄스 유도(PI) 기술을 사용하여 광물 함량이 높거나 지형이 불규칙한 곳에서 작거나 중간 크기의 금덩이를 탐지할 때 탁월한 감도를 제공합니다. 또한, SDC 2300은 더 크고 깊은 곳에 묻힌 금덩이도 깊이까지 탐지할 수 있습니다.
아니요, SDC 2300용으로 제공되는 다른 Minelab 브랜드 코일은 없습니다. 기본 제공되는 8인치 원형 코일은 SDC 2300에 탁월한 전반적인 성능을 제공하며, 탐지기의 방수 기능과 컴팩트한 크기를 유지해 줍니다.
아니요, SDC 2300에는 차별 감지 기능이 없습니다.
스피커나 헤드폰을 통해 일정한 임계값 오디오가 출력되지 않으면 임계값 오디오 기능이 꺼져 있거나 최소 설정으로 되어 있음을 나타냅니다.
임계값 볼륨은 손잡이 오른쪽에 있는 임계값 버튼을 눌러 조절할 수 있습니다.
Threshold 오디오는 LED 디스플레이에 9단계로 표시됩니다. Threshold 버튼을 누를 때마다 디스플레이의 LED가 오른쪽으로 조금씩 이동하며, Threshold 오디오 레벨도 함께 증가합니다. Threshold 레벨이 최대치에 도달한 후 Threshold 버튼을 다시 누르면 레벨이 OFF 또는 최소 설정으로 돌아갑니다.

SDC 2300은 저음 또는 고음 두 가지 오디오 피치 설정이 있습니다. 고음이 기본 설정이며, 저음 설정으로 변경하려면 감지기를 끈 다음 감지기를 켜면서 임계값 버튼을 길게 누르십시오.
SDC 2300은 이전 설정을 기억하므로 고음 설정으로 되돌리려면 감지기를 켜는 동안 임계값 버튼을 길게 눌러야 합니다.
SDC 2300은 3m(10피트) 방수 기능을 갖추고 있습니다. 본 제품은 제어 박스를 포함한 완전한 감지기입니다.
네, SDC 2300에는 감도 조절에 염수 모드가 있지만, Minelab은 SDC 2300을 해변에서 사용하는 것을 권장하지 않습니다. SDC 2300에는 표적 식별 또는 판별 기능이 없기 때문에 쓰레기를 많이 파낼 수 있기 때문입니다.
SDC 2300의 염분 모드는 염호나 금광지대에서 흔히 볼 수 있는 습하고 광물화된 토양처럼 염분 함량이 높은 전도성 토양에서 사용하도록 설계되었습니다. 예를 들어, 최근 내린 비로 토양의 전도성이 높아져 원치 않는 전도성 토양 반응이 증폭될 수 있습니다. 토양이 전도성이 높거나 염호에서 탐지 작업을 하는 경우, 감도 다이얼을 염분 모드로 조정하십시오.

SDC 2300의 배터리 잔량을 확인하려면 노이즈 캔슬링 버튼을 길게 누른 다음 임계값 버튼을 눌렀다 놓으세요. 이제 노이즈 캔슬링 버튼에서 손을 떼셔도 됩니다.
배터리 잔량은 LED를 통해 약 3초 동안 표시됩니다.
SDC 2300은 리튬 이온 배터리를 완전히 충전했을 경우 약 8시간 동안 작동합니다. 배터리 충전에는 일반적으로 5~6시간이 소요됩니다. C형 알칼리 배터리를 사용할 경우 일반적으로 사용 시간이 더 길어지지만(10~14시간), 이는 사용하시는 C형 배터리의 품질에 따라 달라질 수 있습니다.
아니요, SDC 2300 배터리는 차량에서 충전할 경우 일반적인 12V 자동차 배터리 시스템으로만 충전해야 합니다.
SDC 2300에는 충전식 리튬 이온 배터리 팩이 본체 내부에 포함되어 있습니다. 배터리 칸에는 C형 알칼리 배터리 또는 C형 니켈수소(NiMH) 충전식 배터리도 사용할 수 있습니다. C형 배터리의 극성은 제어 박스 측면에서 확인할 수 있습니다.
아니요, SDC 2300의 소프트웨어는 업그레이드할 수 없습니다.
골드 몬스터 1000은 미넬랩의 보급형 금 탐사 탐지기로, 광물 함량이 중간 정도인 땅에서 가장 작은 금덩어리까지 찾아내도록 설계되었습니다. 얕은 곳에 있는 작은 금덩어리에 대한 뛰어난 감도를 유지하며, 깊은 곳에 있는 큰 금덩어리도 일부 탐지할 수 있습니다.
화면 상단의 금 함유 가능성 표시기는 대상 물질에 철 또는 비철 금속이 포함되어 있는지 여부를 나타냅니다. 표시기가 지속적으로 오른쪽을 가리키면 비철 금속 함량이 높다는 것을 의미하며, 금, 은, 황동, 구리, 알루미늄, 납, 아연 또는 철(철) 성분이 없는 기타 합금과 같은 비철 금속일 가능성이 높습니다.

지시계가 왼쪽을 가리키면 철 함량이 높다는 것을 의미하며, 강철이나 철일 가능성이 높습니다.
크기가 큰 강철 및 철(철) 표적은 오른쪽에 신호를 나타낼 수 있습니다. 이는 크기가 큰 철 표적의 전도성이 신호를 지배하여 표적의 자기적 특성을 가릴 때 발생합니다.
GM05와 GM10은 GOLD MONSTER 1000과 호환되는 유일한 코일입니다. GM05는 제품 상자에 포함되어 있으며, GM10 코일은 Minelab 대리점에서 액세서리로 구매할 수 있습니다.
현재 GOLD MONSTER 1000용 애프터마켓 점화 코일은 판매되지 않습니다.
코일 케이블을 처음 감을 때는 항상 샤프트 위로 감아야 합니다. 샤프트 위로 코일 케이블을 감으면 케이블에 가해지는 스트레스가 최소화되어 손상을 방지할 수 있습니다. 그런 다음 코일 케이블을 샤프트 주위에 촘촘하게 감되, 탐지 시 코일이 자유롭게 움직일 수 있도록 충분한 공간을 확보해야 합니다.

코일 케이블을 스크린 포드 뒷면의 클립에 끼운 다음, 코일 커넥터를 스크린 포드 뒷면에 조심스럽게 나사로 조여줍니다.


수동 감도 조절 10단계와 자동 감도 조절 2단계가 있습니다.
자동 모드는 감도 조절 다이얼의 11번째 위치에 있으며, 다이얼 중앙에 검은색 점으로 표시됩니다.
자동 모드에서는 탐지기가 대부분의 토양 유형에서 원활하게 작동하며, 원활한 작동을 유지하기 위해 탐지기의 감도 수준을 지속적으로 조정합니다.
자동 플러스 기능은 감도 조절 다이얼의 12번째 위치에 있으며, 다이얼 중앙에 검은색 점으로 표시됩니다.
Auto+는 더욱 강력한 감도를 제공하여 더 깊은 탐지 성능을 발휘하도록 설계되었습니다. Auto+ 설정은 지면 잡음을 증가시킬 수 있으므로, 토양의 광물 함량이 중간 정도일 때만 사용하는 것이 좋습니다.
수동 감도 조정(1~10)은 토양 광물화 및 전자기 간섭(EMI)에 대한 충분한 이해를 가진 전문가 사용자를 위한 것입니다.
수동 감도 설정은 사용자가 탐지기의 성능을 수동으로 조정할 수 있도록 합니다. 수동 범위에서 감도 설정을 선택하면 자동 또는 자동+ 모드처럼 탐지기가 자동으로 감도 레벨을 조정하지 않습니다. 토양의 종류가 다양하거나 광물 함량이 높은 환경에서는 수동 감도를 계속 조정해야 할 수도 있습니다.
골드 몬스터 1000은 매우 민감하여 코일 위로 손을 흔들기만 해도 혈액 속의 염분을 감지할 수 있습니다.
목표물을 회수할 때는 제공된 플라스틱 스쿱을 사용하여 원하는 목표물을 정확하게 찾고 손이 닿지 않도록 해야 합니다.
골드 몬스터 1000은 염분 감지에 매우 민감하기 때문에 해변에서의 사용은 권장하지 않습니다.
잡음이 나거나 소리가 불규칙하게 들리는 것은 일반적으로 탐지기가 지면의 광물화 또는 전자기 간섭(EMI)으로 인한 간섭을 감지하고 있다는 신호입니다. 자동 모드(Auto+)인 경우 감도를 자동 모드(Auto) 또는 더 낮은 수동 감도로 조정해 보세요. 감도를 낮춰도 문제가 해결되지 않으면 EMI 발생원(전력선, 휴대전화 기지국, 발전기, 천둥/뇌우 등)에서 멀리 떨어져 있어야 합니다.
불규칙적인 탐지음은 토양의 광물화로 인해 발생할 수 있습니다. GOLD MONSTER 1000은 토양의 광물 함량을 지속적으로 모니터링하고 탐지기의 지면 균형을 자동으로 조정하는 자동 추적 지면 균형 기능을 갖추고 있습니다. 토양의 광물 함량이 급격하게 변하거나 높은 수준의 광물화가 발생하면 탐지기가 오작동 신호를 보낼 수 있습니다. 이러한 경우, 오작동 신호가 발생하는 영역에서 코일을 위아래로 0.5~10cm(0.2~4인치) 정도 움직여 주십시오. 이렇게 하면 탐지기의 지면 균형이 토양의 광물화 수준에 맞춰 조정될 수 있습니다.
광물화 수준이 너무 높으면 광물화 수준을 보정하기 위해 감도를 낮추십시오.
코일을 공중에 들어 올리면 주변 소음이 증폭됩니다. Minelab은 이러한 사용을 권장하지 않습니다. 이는 당사 제품의 설계 목적이 아니기 때문입니다. 노이즈 캔슬링 작업을 수행할 때 코일을 약간 들어 올리는 것은 허용되지만, 노이즈 캔슬링이 완료되면 간섭을 피하기 위해 코일을 항상 지면 가까이에 두어야 합니다.
아니요, GOLD MONSTER 1000은 무선 기능을 지원하지 않습니다. 컨트롤 포드 뒷면에 3.5mm(1/8”) 스테레오 헤드폰을 연결하여 사용할 수 있습니다.
골드 몬스터 1000은 리튬 이온 배터리를 완전히 충전한 상태에서 시동을 걸면 약 12시간 동안 작동합니다. 배터리 충전에는 일반적으로 5~6시간이 소요됩니다.
아니요, GOLD MONSTER 1000 배터리는 차량으로 충전할 경우 일반적인 12V 자동차 배터리 시스템에서만 충전해야 합니다.
아니요, GOLD MONSTER 1000의 소프트웨어는 업그레이드할 수 없습니다.
일부 컴퓨터의 바이러스 방지 소프트웨어는 Minelab 전자 메일을 스팸 파일 / 폴더에 저장합니다.이 전자 메일의 스팸 폴더를 확인하십시오. 이메일을받지 못한 경우 가까운 Minelab 공식 서비스 센터에 문의하십시오 .
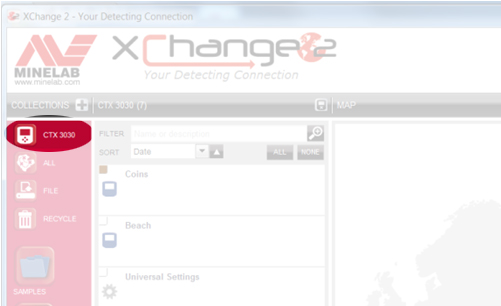
XChange 2를 처음 설치하면 소프트웨어가 CTX 3030이 연결된 것을 처음 인식할 때까지 '파일' 아이콘이 나타나지 않습니다. 이는 처음 연결 시에만 발생합니다. 최초 연결 후에는 '파일' 아이콘이 나타나고 계속 표시됩니다. 이후에는 CTX 3030을 연결하지 않아도 '파일'에 접근할 수 있습니다.
GeoTrails는 공장 초기 설정에서 꺼져 있으므로 켜야 합니다. 먼저 GPS를 켜고, 그 다음 GeoTrails를 켜세요. 지도 화면에서 지도 버튼을 길게 눌러 해당 옵션에 접근합니다. 화살표를 사용하여 'GeoTrails 보기'를 선택하고 선택 버튼을 누르세요.
향상된 GPS 기능은 SBAS(위성 기반 보강 시스템)를 활성화합니다. SBAS는 미국에서 사용되는 WAAS와 유럽에서 사용되는 EGNOS를 통칭하는 용어입니다. 이 시스템은 정지궤도 위성을 사용하여 대기를 관측하고 이를 GPS 수신기로 전송합니다. 미국에서는 잘 작동하지만, 유럽에서는 지상보다는 항공기에서 더 효과적인 것으로 보입니다. 호주에서는 일본 상공의 위성에서 신호를 수신하여 위치 정확도가 떨어지는 경우가 있습니다. 유럽의 다른 지역에서도 이러한 문제가 발생하는지는 확실하지 않습니다.
'사용자' 버튼의 기본 설정은 백라이트 제어입니다. 따라서 사용자가 이 설정을 다른 기능으로 변경하면 백라이트는 메뉴/옵션/백라이트 - 켜기/끄기/시간에서 제어하게 됩니다.
모든 설정이 완료되었으며 시간대도 설정되었습니다.
본인의 UTC 시간대를 모르시는 경우 다음 링크를 참조하십시오: http://www.timeanddate.com/time/map/
WM 10 무선 모듈이 활성화되어 있고 감지기가 연결되어 있으면 정상적으로 신호음이 들립니다. WM 10을 끄면 감지기의 신호음이 음소거됩니다. 감지기의 전원을 껐다 켜면 신호음을 다시 들을 수 있습니다.
CTX 3030은 Explorer SE Pro 및 E-TRAC 모델과 유사한 지면 보정 기능을 갖추고 있어 대부분의 지면 조건에서 매우 효과적으로 작동합니다. 따라서 대부분의 경우 CTX 3030의 지면 밸런스를 조정할 필요가 없습니다. 지면 밸런스는 '극도로 광물질이 많은 지면'에서만 수행해야 합니다. 해변에서는 지면 밸런스를 수행하지 마십시오. 탐지기가 오작동할 수 있습니다.
이는 기본 기능으로, '톤 ID 프로필 편집'을 수행하고 '톤 재생' 또는 '모두 재생'을 선택하면 WM 10 무선 모듈이 연결된 경우 톤이 재생되지 않습니다.
볼륨 설정은 4단계로 조절 가능합니다. CTX 3030은 각 설정값을 기억합니다. 헤드폰을 사용하면서 볼륨을 줄인 후 헤드폰을 분리해도 외부 스피커 볼륨은 이전 설정값 그대로 유지됩니다.
트위스트락 방식 팔걸이를 축에 끼우기 전에 잠금장치를 시계 반대 방향으로 완전히 돌리십시오. 잠금장치를 완전히 90도 돌릴 필요는 없으며, 보통 30~45도 정도만 돌려도 충분합니다.
이 문제는 소프트웨어 업데이트를 통해 해결되었습니다. 탐지기를 XChange 2에 연결하고 소프트웨어 업데이트를 확인하십시오. 항상 최신 소프트웨어 업데이트를 사용하는 것이 좋습니다. 최신 업데이트를 사용 중이거나 업데이트 후에도 문제가 해결되지 않으면 지역 Minelab 공인 서비스 센터에 문의하십시오.
모드는 영어를 다른 언어로 변경할 때만 변경(또는 번역)되며, 반대로 영어를 다른 언어로 변경할 때는 변경되지 않습니다. 탐지기를 처음 설정할 때 영어가 아닌 다른 언어를 사용하면 모드가 해당 언어로 표시됩니다. 하지만 나중에 언어를 영어로 변경하더라도 모드는 원래 언어로 유지됩니다.
해당 버튼을 누르면 현재 진행 중인 모든 조정이 취소되고 메뉴에서 이전 단계로 돌아갑니다.
마지막으로 XChange 2에 연결한 이후로 탐지기를 많이 사용하셨다면 저장된 데이터가 많을 것입니다. 데이터 업로드에 몇 분 정도 소요될 수 있으니 잠시 기다려 주십시오.
이는 마스킹, 낮은 감도 설정, 코일 과부하 등과 관련이 있을 수 있습니다. '공장 초기화'를 수행하고 탐지기를 다시 테스트하십시오.
WM 10 무선 모듈을 탐지기에 연결하려면 다음 단계를 따르십시오.
페어링에 실패하면 다른 채널을 선택해 보세요.
WM 10의 위치는 신호 손실에 영향을 미칠 수 있습니다. 인체는 신호를 매우 잘 감쇠시키기 때문에 WM 10을 탐지기에서 멀리 떨어진 등 쪽에 부착하면 문제가 발생할 수 있습니다. 문제가 발생하는 경우 WM 10을 탐지기와 시야가 확보되는 위치에 설치하여 최상의 결과를 얻으십시오.
스냅샷은 감지기가 켜져 있는 동안에만 저장됩니다. 감지기가 꺼지면 스냅샷이 삭제되는 것은 설계상의 특징입니다.
GPS를 처음 사용할 때는 탐지기가 지역 데이터를 축적하는 데 시간이 다소 걸립니다. 전원을 켠 후 위성의 위치 등을 파악하는 데 몇 분이 소요되지만, 충분한 지역 데이터를 확보하는 데는 최대 한 시간까지 걸릴 수 있습니다. 이 데이터를 활용하면 해상도를 높이고 흐린 하늘에서도 탐지가 가능합니다.
원하는 모드 및/또는 데이터를 파일로 저장한 후 해당 파일을 이메일로 보내기만 하면 됩니다. 절차는 다음과 같습니다.
CTX 3030의 모든 모드 및 기타 데이터가 목록에 표시됩니다.
전체 파일 모음은 하나의 파일로 내보내져 PC의 다운로드 폴더에 저장됩니다. 그런 다음 파일을 다른 위치에 저장하거나 원하는 사람에게 이메일로 보낼 수 있습니다.
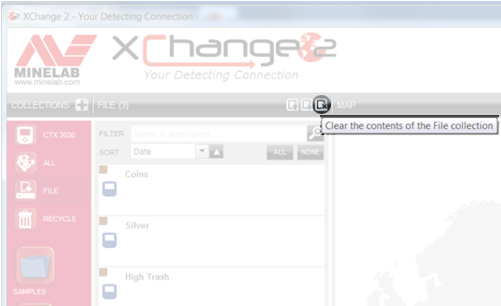
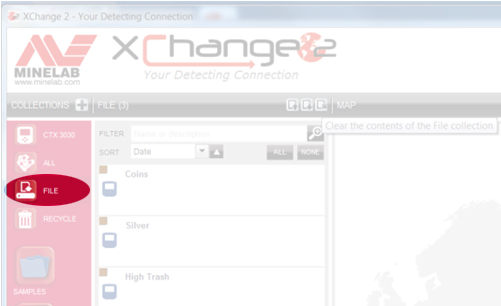
다른 사람으로부터 Minelab 파일을 받은 경우, XChange 2를 열고 파일 컬렉션을 선택한 다음 '파일 컬렉션 내용 지우기' 아이콘을 클릭하기만 하면 됩니다.
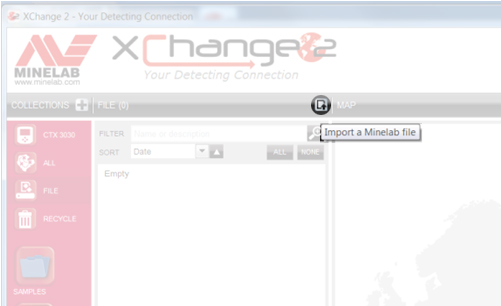
그런 다음 'Minelab 파일 가져오기' 아이콘을 클릭합니다.
그런 다음 '파일 선택'을 클릭하세요.
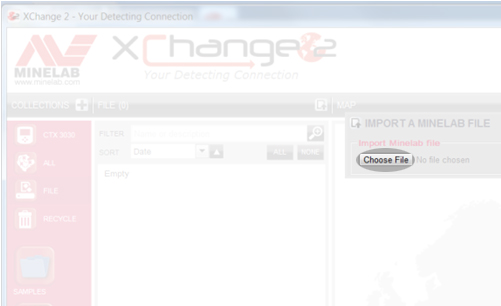
파일 위치를 찾아 선택하세요. 파일을 선택하고 '열기'를 클릭하면 파일 안의 항목들이 파일 모음에 표시됩니다.
보관하고 싶은 항목을 드래그 앤 드롭하여 나만의 컬렉션에 넣거나 CTX 3030에 바로 추가하세요.
결합 오디오 기능은 철 함량이 높은 물체와 전도율이 다양한 물체에 대해 서로 다른 음색을 생성합니다. 먼저 철 함량 기준선(가로선)을 설정하여 철 함유 물체에 대해 오디오 응답을 발생시킬 위치를 지정합니다. 예를 들어, 기준선을 21로 설정하면 철 함량이 21 이상(더 큰 숫자)인 물체는 프로그래밍된 철 함유 물체용 음색을 발생시킵니다. 반대로 철 함량이 21 미만인 물체는 전도율에 따라 오디오 응답이 결정됩니다. 결합 오디오 기능에는 전도율 값을 01부터 50까지 나타내는 네 개의 '빈'이 있습니다. 각 빈의 기준선을 움직여 서로 다른 물체 그룹을 지정하고 각 그룹에 해당하는 음색을 할당할 수 있습니다. 예를 들어, 첫 번째 빈을 01과 14로 설정하면 철 함량이 21 미만이고 전도율이 14 이하인 물체는 이 빈에 속하여 프로그래밍된 기준선에 해당하는 음색을 발생시킵니다.
예를 들어, 두 번째 빈은 15에서 28 사이의 목표물을 나타낼 수 있습니다. 세 번째 빈은 29에서 40 사이의 목표물을, 네 번째 빈은 CO 값이 41에서 50 사이인 나머지 전도성 목표물을 나타낼 수 있습니다. 이 예시에서 사용된 숫자를 기준으로, FE 값이 12이고 CO 값이 44인 목표물을 지나가면 전도성 빈 4에 할당된 전도성 톤이 발생합니다. ID가 11에서 22 사이인 목표물을 지나가면 전도성 빈 2에 할당된 톤이 발생합니다. 사용자는 각 목표물 그룹(빈)의 크기를 조정하고 톤을 할당할 수 있습니다. E-TRAC을 사용하여 투톤 페러스(Two Tone Ferrous)에서 사냥을 즐겼던 분들은 이 기능을 통해 FE 라인을 조정하고 CO 목표물을 네 개의 개별 그룹으로 나눌 수 있다는 점에서 더욱 편리함을 경험하실 수 있을 것입니다.
금의 전도도는 10-09에서 13-30 범위 내에서 측정될 수 있으며, 이 범위를 벗어나는 경우도 있습니다. 때로는 전도도 수치가 02처럼 매우 낮게 나올 수도 있으므로, 성공 확률을 높이려면 알루미늄 호일이나 캔 따개 등 모든 것을 꼼꼼히 파헤쳐야 합니다.
설정에 관해서는 기본 비치 모드가 적합합니다. 한 가지 팁을 드리자면, 톤 ID 프로필을 페러스 35로 변경해 보세요. 이렇게 하면 전도성이 낮은 보석이 전도성 프로필보다 더 높은 톤을 발생시켜 쉽게 구별할 수 있습니다. 또한, '결합'을 선택하여 개인 취향에 맞게 톤을 사용자 지정할 수도 있습니다.
염수 해변에서는 해변의 자성 광물 함량이 높지 않은 한 수동 감도 설정을 권장합니다. 기기가 감도 18에서 안정적으로 작동한다면 조금 더 높여 보세요. 실제로 염수에서 탐지할 때는 해수 설정을 켜십시오.
해변에서 탐색하는 사람들이 흔히 하는 또 다른 방법은 탐지기 패턴을 조금 넓히는 것입니다. 주로 철 성분 제거 기능을 약간 낮추거나 패턴 2에서 탐색하는 것입니다(탐지 버튼을 눌렀다 떼기만 하면 됩니다). 이 방법은 쓰레기가 적은 해변에서 특히 유용합니다. 또한, 오디오 응답 설정을 'LONG'으로 변경해 보는 것도 좋습니다. 이렇게 하면 보석류에서 발생하는 아주 미세한 탐지 신호를 더 잘 들을 수 있습니다.
FindPoints 및 WayPoints 편집에 대한 승인된 커뮤니티 교육 영상을 시청하세요.
FindPoints에 휴대폰 사진을 연결하는 방법에 대한 승인된 커뮤니티 안내 영상을 시청하세요.
지오헌트 기록 방법을 포함한 승인된 커뮤니티 안내 영상을 시청하세요.
FindPoint 또는 WayPoint를 기록하는 방법을 설명하는 승인된 커뮤니티 교육 영상을 시청하세요.
GPS 기능을 활성화하는 방법을 설명하는 승인된 커뮤니티 안내 영상을 시청하세요.
감지 화면 옵션 활성화 방법을 설명하는 승인된 커뮤니티 교육 영상을 시청하세요.
대형 타겟 ID 패널 켜기 방법을 포함한 승인된 커뮤니티 교육 영상을 시청하세요.
승인된 커뮤니티 교육 영상 (감도 패널 켜기 방법 포함)을 시청하세요.
승인된 커뮤니티 교육 영상을 시청하세요. 영상에는 감지 화면 탐색 도구를 켜는 방법이 포함되어 있습니다.
CTX 3030에서 검색 모드를 선택하는 방법을 설명하는 승인된 커뮤니티 교육 비디오를 시청하세요.
CTX 3030에서 검색 모드를 편집하는 방법을 설명하는 승인된 커뮤니티 교육 비디오를 시청하세요.
CTX 3030에서 XChange 2로 데이터를 전송하는 방법을 설명하는 승인된 커뮤니티 교육 비디오를 시청하세요.
XChange 2에서 새 컬렉션을 만드는 방법을 설명하는 승인된 커뮤니티 교육 비디오를 시청하세요.
XChange 2 환경설정 변경 방법을 설명하는 승인된 커뮤니티 교육 영상을 시청하세요.
승인된 커뮤니티 교육 영상 (범용 설정 조정 방법 포함)을 시청하세요.
XChange 2에서 새 검색 모드를 만드는 방법을 설명하는 승인된 커뮤니티 교육 영상을 시청하세요.
아니요, FBS 2 코일은 CTX 3030에만 사용할 수 있으며, FBS 코일은 E-TRAC, Safari 및 Explorer 시리즈 탐지기에만 사용할 수 있습니다.
MULTI-IQ+는 차세대 MULTI-IQ 기술로, 도심 지역에서 전자기 간섭(EMI)을 줄이면서 더 강력한 출력을 제공합니다.
이 기능은 탁월한 성능과 심층 분석을 제공하여 사용자가 대부분의 위치에서 이전에는 탐지할 수 없었던 목표물을 찾을 수 있도록 해줍니다.
MANTICORE에 사용된 MULTI-IQ+ 기술은 더 나은 감지 깊이, 향상된 복구 속도, 더 많은 감도 조정 및 사용자에게 더 많은 정보를 제공하는 고급 2D 식별 화면과 동일한 더 많은 전력과 더 빠른 처리를 제공하므로 MANTICORE는 거의 모든 면에서 EQUINOX 감지기를 능가합니다. 땅을 파기 전에 목표물을 찾아보세요.
현재 MANTICORE와 호환되는 다른 코일은 없습니다.
액세서리 코일은 현지 Minelab 대리점에서 구입할 수 있습니다. 가장 가까운 대리점을 찾으려면 온라인 대리점 찾기 도구를 사용하십시오.
ML105 헤드폰은 MANTICORE 감지기와 함께 상자에 포함되어 있으며 폼 패드가 머리 위에 위치하여 귀를 감싸는 오버이어형 헤드폰입니다.
ML85 헤드폰은 폼 패드가 귀 바깥쪽에 위치하는 온이어형 헤드폰입니다.
ALL TERRAIN GENERAL: 대부분의 대상과 조건에 대해 탁월한 만능 성능을 제공합니다. 뛰어난 타겟 분리 및 뛰어난 쓰레기 거부 기능을 제공합니다.
ALL TERRAIN FAST: 회수 속도가 향상되어 탁월한 표적 분리 및 우수한 코크스 제거 기능을 제공합니다.
모든 지형 고전도체: 은화 스택 또는 구리 타겟과 같은 고전도체에 탁월하며 우수한 타겟 ID 분리를 제공합니다.
모든 지형 낮은 도체: 망치로 두드린 동전이나 순금 장신구와 같은 작고 얇은 물체에 탁월합니다.
모든 지형 쓰레기 거부: 쓰레기가 많은 지역에서 사용됩니다. 최대 철 거부율
해변 일반: 건조하거나 젖은 모래 위에서 사용할 때 대부분의 대상과 해변 조건에 대해 탁월한 만능 성능을 발휘합니다. 뛰어난 타겟 분리 및 뛰어난 쓰레기 거부 기능을 제공합니다.
BEACH LOW CONDUCTORS: 금 사슬과 같은 작거나 얇은 대상에 탁월합니다. 건조하고 젖은 모래 모두에 적합합니다.
BEACH DEEP: 금 사슬과 같은 작거나 얇은 대상에 탁월한 깊이를 제공하는 낮은 복구 속도입니다. 건조하고 젖은 모래 모두에 적합합니다.
해변 서핑 및 해수: 수중 또는 서핑 감지를 포함한 까다로운 바닷물 조건에 탁월합니다.
GOLDFIELD 일반: 양성에서 중간 정도의 광물 토양에 있는 작은 덩어리에 탁월합니다. 이 모드는 금 덩어리에 대해 전반적으로 더 나은 성능을 제공하며 사용자가 희미한 표적 반응을 들을 수 있도록 돕는 연속 피치 오디오를 포함합니다. 이 모드는 쓰레기가 많은 영역에는 권장되지 않습니다.
빈도가 MULTI-IQ+로 설정된 경우 철류 타겟에는 비철류 타겟과 동일한 눈금의 타겟 ID가 할당되며 이는 비철류 타겟 ID와 동일한 눈금으로 표시됩니다. 내부 프로세서가 타겟을 철금속으로 분류하면 탐지기는 타겟 ID 번호 아래에 빨간색 철 표시기와 함께 낮은 오디오 신호음을 내며 2D 화면에서는 타겟이 타겟에서 멀리 떨어진 화면 상단이나 하단에 표시됨을 나타냅니다. 중앙 전도성 라인. 

*이미지는 설명 목적으로만 사용됩니다.*
일부 동전과 유사한 철 및 전도성 특성이 결합된 복잡한 철 타겟은 일반적으로 2D 화면의 아래쪽 절반에 나타납니다.
더 큰 철 타겟이 화면 상단에 나타납니다. 

전도성이 높은 대형 볼트와 같은 원통형 모양의 대형 철 타겟도 있을 수 있습니다. 이러한 유형의 타겟은 철 및 비철 영역 모두에서 타겟 추적을 표시할 수 있습니다.
*이미지는 설명 목적으로만 사용됩니다.*
차별을 통해 사용자는 개인 또는 대상 ID 그룹을 수락하거나 거부할 수 있습니다. 식별이 조정되면 철 및 비철 타겟 ID 모두에 변경 사항이 적용됩니다. 이는 선택한 타겟 ID의 철 및 비철 부분을 모두 회색으로 표시하는 수직선으로 표시됩니다.
철류 한계를 통해 사용자는 감지기 매개변수를 조정하여 무엇이 철류 또는 비철류 타겟으로 감지되는지 결정할 수 있습니다. 이는 2D 화면의 상단과 하단 모두에서 조정할 수 있습니다.
*이미지는 설명 목적으로만 사용됩니다.*
일반적으로 검출기를 사용할 경우 다중 주파수가 단일 주파수보다 우수합니다. 그러나 특정 주파수가 고유한 이점을 갖는 특수한 상황이 있을 수 있습니다.
*단일 주파수를 사용하는 경우 철류 한계가 비활성화되고 철류 타겟은 1~19의 타겟 ID를 제공하고 화면에 빨간색 철류 표시를 표시합니다.*
일반적인 사용 시간은 완전 충전 후 약 10시간 입니다 . MANTICORE 감지기는 0.5A 또는 2A(@ 5V) 출력 기능을 지원하는 모든 USB 보조베터리에서 직접 전원을 공급받을 수도 있습니다. 이는 사용되는 보조 배터리에 의해서만 제한되는 지속적인 런타임을 효과적으로 제공합니다.
*MANTICORE 감지기가 USB 보조 배터리에 연결된 경우 수중에서는 사용할 수 없습니다*
MANTICORE 감지기는 USB 2.0 표준을 준수하는 장치에서의 충전을 지원합니다. QuickCharge™는 더 높은 전압을 사용하고 MANTICORE 감지기와 호환되지 않는 Qualcomm에서 개발한 독점 표준입니다 .
완전히 방전된 상태에서 100%까지 충전 시간은 고용량 충전기(>1.7A @ 5V)로 충전 시 약 7시간 입니다.
USB 배터리 충전 1.2(BC1.2)와 호환되는 모든 표준 USB 포트를 사용하여 배터리를 충전할 수 있지만 저전력 옵션을 사용하는 경우 충전 시간이 더 길어질 수 있습니다.
모든 배터리의 수명은 사용자가 어느 정도 제어할 수 있는 여러 요인에 따라 달라집니다. 온도, 보관 시 충전 수준, 충전 주기 등 리튬 이온 배터리의 수명이 단축되는 가장 일반적인 원인은 완전히 충전된 배터리를 높은 온도에서 유지하는 것입니다.
감지기에 사용되는 모든 구성 요소와 마찬가지로 당사는 책임 있는 공급업체로부터 최신 고품질 구성 요소만을 엄격하게 조달합니다. 수년 동안 사용자가 배터리 문제를 겪을 것으로 예상하지 않습니다. Li-ION 배터리를 사용하는 CTX 3030 및 GPZ 7000 감지기에 대한 우리의 경험에 따르면 대다수의 사용자는 교체 배터리를 구입할 필요가 전혀 없었습니다.
아래에 설명된 대로 MANTICORE 배터리를 충전할 때는 평판이 좋고 인증된 USB 충전기만 사용하십시오.
핸들에 포함된 리튬 이온 배터리는 교체가 가능하며 보증 기간이 적용됩니다. 구입일로부터 6개월. Minelab에서는 방수 씰의 손상 가능성과 감지기 보증 무효화를 방지하기 위해 공인 서비스 센터를 이용할 것을 권장합니다.
네, 육지에서 감지할 때는 제한이 없습니다. 그러나 감지기를 충전 중이거나 보조 배터리에 연결한 상태에서는 수중에서 사용해서는 안 됩니다.
예. 감지기를 사용하는 경우 USB 보조 배터리로 전원을 공급할 때 보조 배터리에 여유 용량이 충분하면 배터리 충전 속도가 느려질 수 있습니다.
예. 물이나 해변에서 감지한 후에는 깨끗하고 담수로 감지기를 세척하는 것이 좋습니다. 감지기를 청소할 때 연마제나 용제를 사용하지 마십시오.
아니요. 방수 씰을 포함하여 감지기의 어떤 부분에도 윤활유를 칠할 필요가 없습니다. 석유계 그리스를 사용하면 방수 씰이 손상되고 보증이 무효화됩니다.
물속이 깊거나 물에 완전히 잠긴 경우에는 Minelab 방수 헤드폰 만 사용하는 것이 좋습니다. 여기에는 MANTICORE와 함께 사용할 때 방수 밀봉을 형성하도록 특별히 설계된 커넥터가 있습니다. 이 헤드폰은 현지 Minelab 대리점에서 구매 가능한 액세서리로 제공됩니다.
하드와이어링 코일은 심해 탐지기에 더 안정적입니다.
아니요, 8 x 1.2V는 9.6V에 불과하며, 이 감지기는 작동하려면 12V가 필요합니다.
배터리가 완전히 충전되었는지 확인하십시오. 배터리 잔량이 부족하면 임계값이 지나치게 커지고 반응이 불규칙해집니다.
Salt, sand and grit will accumulate on the Excalibur II. So make sure you thoroughly rinse it with fresh water after use, including the coil cover, shafts and battery pack. Don't forget the vent holes on each headphone diaphragm as these need to be clear if used for diving purposes to allow for ear equalisation.
The Multi-IQ engine in all EQUINOX series is the same, there are however processor enhancements in the EQUINOX 700 and EQUINOX 900 that allow the detector to provide users with better Iron Bias, target separation and discrimination depth.
Park 1 (General/Coins)
Park 1 is optimised for modern coins and larger jewellery with a default discrimination pattern set to reject many common aluminium foil-like targets. Therefore, this is the ideal Profile to start with to learn EQUINOX before experimenting with the other Modes and more specialist settings. Park 1 Multi-IQ processes a lower frequency weighting of the multi-frequency signal, as well as using algorithms that maximise ground balancing for soil to achieve the best signal-to-noise ratio. Hence Park 1 is most suited for general detecting and coin hunting.
Park 2 (Fine jewellery)
Park 2 is ideal for smaller targets in trash-infested (including ferrous trash) locations. It will detect a wider range of targets including low conductor (or higher frequency) targets, e.g. fine jewellery. All non-ferrous targets are accepted by default. Recovery Speed is increased to clearly identify good targets masked by iron trash. Target Tone is set to maximum to provide as much target information as possible via audio. Park 2 Multi-IQ processes a higher frequency weighted multi-frequency signal while ground balancing for soil.
Field 1 (Coins and Artefacts)
Field 1 is for general hunting with high trash rejection. This assists in locating desired targets more easily. The default discrimination pattern is set to reject most coke signals. The first Tone Break is set so that the coke signals will produce the same low tone as ferrous targets. Field 1 Multi-IQ processes a lower frequency weighted multi-frequency signal, as well as using algorithms that maximise ground balancing for soil, to achieve the best signal to noise ratio. Hence being most suited for general detecting and coin hunting.
Field 2 (Fine coins and Artefacts)
Field 2 suits locations with high target and trash densities. It will better detect small hammered coins on their edge or at greater depth. The default discrimination pattern is set to reject most coke signals. Target Tone is set to maximum to enhance audio identification and Recovery Speed is faster. The first Tone Break has been set so that the coke signals will produce the same low tone as ferrous targets. Field 2 Multi-IQ processes a higher frequency weighted multi-frequency signal while ground balancing for soil.
Beach 1
Beach 1 is most useful for detecting in wet or dry beach sand and also in shallow water where conductive salt signals are prevalent. It has good sensitivity to coins and small/large jewellery. Beach 1 reduces the salt signal, while maintaining high transmit power, and still being sensitive to desirable targets. Beach 1 Multi-IQ processes a low frequency weighted multi-frequency signal, and uses special algorithms to maximise ground balancing for salt
Beach 2
Beach 2 gives the best results when either wading or shallow diving with the coil and/or detector fully submerged. In these instances, there is a very strong salt signal present, so Beach 2 has a lower transmit power, which results in much less noise. This profile may also be useful in dry conditions where there are extremely high ground noise levels. Beach 2 Multi-IQ processes a very low weighted multi-frequency combination, using the same algorithms as Beach 1 to maximise ground balancing for salt.
Multi-IQ (EQUINOX 800 & 900 only)
Gold 1
Gold 1 is suitable for searching for small gold nuggets in ‘mild’ ground. Most goldfield locations have a variable level of iron mineralisation that will require an ongoing Ground Balance adjustment, therefore Tracking Ground Balance is the default setting. The audio Threshold Level and Threshold Pitch are optimised for hunting for gold nuggets. Gold 1 Multi-IQ processes a high frequency weighted multi-frequency signal, while ground balancing for mineralised soil.
Gold 2
Gold 2 is best for searching for deeper gold nuggets in ‘difficult’ ground conditions. Gold 2 has a lower Recovery Speed, which will increase detection depth. However, more ground noise in more heavily mineralised grounds may result. Tracking Ground Balance is the default setting. The audio Threshold Level and Threshold Pitch are optimised for hunting for gold nuggets. Gold 2 Multi-IQ processes a high frequency weighted multifrequency signal, while ground balancing for mineralised soil.
EQUINOX 700
• Weight has been decreased to 1.27kg (2.8lb)
• Waterproof to 5m (IP68)
• Three piece collapsible shaft now 144cm - 61cm (56.7" - 24")
• All carbon fibre shafts
• New, easily adjustable armrest
• 119 Target ID Range (-19 to 99)
• 119 discrimination notch segments
• "Depth Pitch" audio option in all modes
• Improved target separation
• Improved ferrous rejection
• Red LCD backlight
• Keypad backlight
• LED flashlight
• Handle vibration target indication
EQUINOX 900
• All above features
• Greater Sensitivity range 1 - 28
• Includes EQX06 6" waterproof DD coil
The new carbon fiber shaft design allows users to pack the detector down to 61cm (24 in) and has a full extension of 144cm (56.7 in)
Depth performance will differ depending on conditions and detector settings. Beach performance is better overall. Enhancements have been made to improve recovery speed, target separation and discrimination depth allowing users to have solid target IDs at better depths. EQUINOX 900 comes with 28 levels of sensitivity allowing more depth where environmental conditions allow the sensitivity to be turned up.
What are the frequency differences between the EQUINOX 600, 700, 800 & 900?
The EQUINOX 600 and 700 offer a choice of 4 single selectable frequencies:
• 4kHz
• 5 kHz
• 10 kHz
• 15 kHz
The EQUINOX 800 and 900 offers the choice of 6 single selectable frequencies:
• 4kHz
• 5 kHz
• 10 kHz
• 15 kHz
• 20 kHz
• 40 kHz
Gold Mode is designed to enhance performance on small gold nuggets in mineralized ground. It does so primarily by using different audio processing so that targets respond both in volume and pitch. The Gold Mode will be of interest to gold prospectors but has less application for other uses.
While the EQUINOX 600 and 700 do not have a dedicated Gold prospecting mode. Multi-IQ is so good in both Park 2 and Field 2, that these profiles are as good, or better, at finding gold nuggets than many dedicated single-frequency gold detectors. Multi-IQ provides very stable ID’s which is great for choosing what targets to dig in a goldfield.
Iron Bias is a setting that lets you choose how you want iron in the ground to sound. If you have a low setting, more of the iron will come through as a good target to dig up. This will also give you the best chance of finding any valuable non-ferrous targets nestled among the iron.
However, if you desire to hear less false audio sounds from the iron in the ground, try increasing the Iron Bias setting.
The Iron Bias in the EQUINOX 700 and EQUINOX 900 has had some changes to improve discrimination depth.
EQUINOX 600 and 800 have the option to choose either FE Iron Bias or F2 Iron Bias. FE Iron Bias will provide control over the target ID response. F2 Iron Bias will provide tone and target ID response adjustment for a wider range of ferrous targets.
Iron Bias in the EQUINOX 700 and EQUINOX 900 is based off the F2 Iron Bias in the EQUINOX 600 and EQUINOX 800 but allows even better overall depth detection and target separation. Because of this there is no F2 option available in the EQUINOX 700 or EQUINOX 900.
Yes, Coiltek Coils manufacture Minelab approved aftermarket coils for the EQUINOX and X-TERRA-PRO detectors.
No, they have different technology requirements and are not compatible. Only Minelab EQX coils are compatible with EQUINOX series detectors.
Having a larger target ID scale allows the detector to provide the user with more information on the target prior to digging it. This allows users to identify more targets individually which will help determine if the target is valuable or trash.
In general, Multi is superior to the single frequencies when using an EQUINOX. However, there may be specialised situations where a particular frequency has a unique advantage. The EQUINOX Series offers users simultaneous Multi-Frequency plus a wide range of single selectable frequencies for specialist situations.
Yes, there is no need to perform a full factory reset. Individual Search Profiles can easily be returned to their factory preset settings. Only the local settings will be reset and any global settings will remain in their last-use state.
Beach Mode automatically senses black sand and reduces the transmit power to ensure that targets can still be detected without overloading occurring. When black sand is sensed, the Beach Overload Indicator will appear on the LCD. When this icon disappears, full transmit power automatically resumes.
Depth Pitch is an audio mode that provides a continuous pitch audio with no threshold tone. It provides separate audio for ferrous and non-ferrous targets with a variable pitch.
Small or deep targets providing a weaker signal will have a lower pitch.
Large or shallow targets providing a stronger signal will have a higher pitch.
EQUINOX 700 and EQUINOX 900 have been designed to handle harsh outdoor environments. Our testing includes drop tests up to 1m, flex and water ingress testing. Both models are IP68 rated and can be submerged up to 5m (16ft)
Middle and Lower shafts can be mixed. They are not identical in size so they may not provide an exact fit. Upper shafts cannot be changed as the physical mounting point of the control pod is different.
Yes. The supplied magnetic USB charge cable can be used on all EQUINOX models, MANTICORE and X-TERRA PRO detectors.
The charge time, from completely flat to 100%, is approximately 4 hours when charged with a high capacity charger (>1.7A @ 5V).
Longevity for all batteries depends on a number of factors that are often controllable to some degree by the user; such as temperature, charge levels when stored, charge cycles etc. The most common cause of reduced life of Li-ION batteries is keeping a fully charged battery at elevated temperatures.
As with all components used in our detectors, we stringently source only modern high quality components from responsible vendors. We do not expect users to experience any battery issues over years of use. Our experience with the CTX 3030 and GPZ 7000 detectors which both use Li-ION batteries is that the vast majority of users have never needed to purchase a replacement battery.
• Avoid charging or using in extreme temperatures.
• Avoid rapid extreme temperature swings.
• Use only Minelab or Minelab recommended USB chargers and avoid so-called ultrafast chargers from third-parties that claim to fully charge Li-ION batteries in less than one hour.
• Before storing the detector for prolonged periods, the battery should be charged to approximately 50-60%. On the EQUINOX Battery Status Indicator, 2-bars is the optimum charge for prolonged storage. Maintaining the 2-bar charge periodically during extended storage is also advisable. Extended storage in temperatures less than 30oC (86’F) will also minimize degradation to Li-ION battery life
Use only reputable and certified USB Chargers when charging the EQUINOX battery as detailed below:
Typical runtime, from a full charge using wired headphones, is approximately 12 hours. The EQUINOX Series detectors can also be powered directly from any USB Power Bank that supports 0.5A or 2A (@ 5V) output capability. This effectively gives a continuous runtime only limited by the power banks being used.
The EQUINOX detectors support charging from devices that comply to the USB 2.0 standard. QuickCharge™ is a proprietary standard develop by Qualcomm that uses a higher voltage and is not compatible with EQUINOX detectors.
손잡이에 포함된 리튬 이온 배터리는 교체가 가능하며 구입일로부터 6개월 동안 보증이 적용됩니다. Minelab에서는 방수 씰의 손상 가능성과 감지기 보증 무효화를 방지하기 위해 공인 서비스 센터를 이용할 것을 권장합니다.
*EQUINOX 600 및 EQUINOX 800 배터리는 EQUINOX 700 또는 EQUINOX 900과 호환되지 않습니다.
Yes, when detecting on land, without any limitations. However, the detector must not be used underwater whilst charging or when connected to a power bank.
Yes. If the detector is being used, when powered by a USB power bank, the battery may charge at a slower rate if there is enough spare capacity in the power bank.
Yes. Connecting the WM 08 to a power bank will allow you to continue to use it even if the battery is low/flat. The power bank will charge the WM 08, which will continue operating as normal.
*Please note that the WM08 is not compatible with the EQUINOX 700 OR EQUINOX 900
No. They are separate wireless technologies and only one can be used at any one time.
*Please note that the WM08 and Bluetooth headphones are not compatible with the EQUINOX 700 OR EQUINOX 900
Re-pairing will be required if a different wireless device has been connected to the Equinox 600 or Equinox 800 (e.g. WM 08), or following a detector factory reset.
AUDIO
Bluetooth® Hearing Aids are largely intended to allow the wearer to intentionally connect to other Bluetooth® compatible devices, such as phones and audio streams. They enable the wearer to stream audio on-the-go without having to remove the hearing aid and insert earbuds.
The EQUINOX 600 and EQUINOX 800 detectors are Bluetooth® compatible devices.
While there are various different types of streaming audio hearing aids available on the market, if the hearing aid supports Bluetooth® A2DP or Bluetooth® aptX-Low Latency™ then it will be compatible with the EQUINOX 600 and EQUINOX 800 detectors.
Pairing with the EQUINOX 600 or EQUINOX 800 is achieved by pressing and holding the Wireless button on the side of the Control Unit for 5 seconds.
While pairing is being performed the Wireless icon on the LCD will flash rapidly for 15 seconds. After 15 seconds the Bluetooth® icon will start flashing on the LCD to indicate a Bluetooth device is being paired.
The initial pairing may take up to 5 minutes. During the pairing process the user should not press the Wireless button as this will stop the pairing process.
Once paired, the EQUINOX 600 or EQUINOX 800 will display a solid Bluetooth® icon on the top right of the LCD. If the hearing aid is aptX-Low Latency™ Bluetooth compatible the ‘+’ icon will also be displayed.
Consult your Hearing Aid User Manual for additional pairing instructions specific to your hearing aid.
*Please note that EQUINOX 700 and EQUINOX 900 are not currently compatible with hearing aids.
Yes, the Equinox 600 can still pair to Bluetooth A2DP or Bluetooth aptX-Low Latency headphones.
Yes. It is good practice to wash the detector with clean fresh water after detecting in water or on the beach. Never use abrasives or solvents to clean the detector.
Whenever washing or using your detector underwater always ensure that the plastic bung on the rear of the control pod is firmly screwed into the headphone jack.
No. It is not necessary to lubricate or grease any part of the detector, including the waterproof seals. Using any petroleum-based grease will damage the waterproof seals and void the warranty.
If deep wading or fully submerged, we recommend using only Minelab Waterproof EQUINOX Headphones. These have a specially engineered connector that forms a waterproof seal when used with the EQUINOX. These headphones are available as an accessory from your local Minelab authorised dealership (Part Number: 3011-0372)
Yes, the MULTI-IQ technology in the X-TERRA ELITE is the same as the MULTI-IQ technology used in other MINELAB metal detectors.
X-TERRA ELITE includes a 15kHz single frequency option for the Park and Field modes.
X-TERRA ELITE는 우수한 성능을 갖춘 합리적인 가격의 감지기를 찾는 보다 헌신적인 감지기를 위해 설계되었습니다. 사용자는 탐지기가 탐지 성능을 조정할 수 있도록 더 많은 제어 및 설정 조정 기능을 제공합니다. X-TERRA ELITE는 5미터(15피트)까지 방수가 가능하며 현재 시중에 나와 있는 다른 단일 주파수 감지기와 비교할 때 탁월한 성능을 제공합니다.
VANQUISH 시리즈는 탁월한 성능을 제공하면서도 최소한의 설정 조정으로 사용이 매우 용이하도록 설계된 스위치 온 앤 고(Switch-On) 유형의 감지기입니다. 이는 MULTI-IQ 프로세서가 모든 어려운 작업을 수행하므로 가능합니다.
VANQUISH 감지기는 초보자에게 권장되며, X-TERRA ELITE 감지기는 초급 감지기에서 업그레이드하려는 중급 감지기 사용자에게 권장됩니다.
V*X 또는 EQUINOX 시리즈 코일은 X-TERRA ELITE와 함께 사용할 수 있지만 이전 X-TERRA 305, 505 및 705 시리즈 코일을 포함하여 다른 Minelab 브랜드 코일은 사용할 수 없습니다.
X-TERRA ELITE에는 V12X 12인치 Elliptical Double-D 코일이 상자에 함께 제공됩니다. 현지 Minelab 대리점에서 아래 액세서리 코일을 구입할 수 있습니다.
X-TERRA ELITE will out-perform the VANQUISH and X-TERRA PRO detectors in all terrains on most targets. Performance may be similar in some circumstances but will differ depending on ground mineralisation levels but more specifically the type of metal each target consists of.
The X-TERRA ELITE provides unprecedented performance in salty conditions. There are 2 beach modes to ensure stability in both wet and dry salty environments.
Yes, you can purchase the Minelab WM09 wireless module, ML85 headphones or ML105 headphones as all of these are compatible with the X-TERRA ELITE. (note that the X-TERRA ELITE EXPEDITION model includes the ML85 headphones in the box)
X-TERRA ELITE는 현재 버전의 BLUETOOTH와 호환되지 않는 독점 무선 오디오를 사용합니다. Minelab ML85 또는 ML105 헤드폰과 WM09 무선 모듈은 X-TERRA ELITE와 호환되며 현지 공인 Minelab 대리점에서 구입할 수 있습니다.
Park 1 provides a default MULTI-IQ transmit frequency and is optimised for detecting modern coins and larger jewellery. This is a good mode to learn the X-TERRA ELITE before experimenting with other settings.
Park 2 provides a default MULTI-IQ transmit frequency and is optimised for detecting fine jewellery and smaller targets in trash infested areas. Recovery speed in Park 2 is increased to clearly identify good targets masked by iron trash.
Field 1 provides a default MULTI-IQ transmit frequency and is optimised for detecting modern coins and general detecting. It has a high trash rejection which makes it an ideal detect mode for areas containing coke.
Field 2 provides a default MULTI-IQ transmit frequency and is optimised for locations with high target and trash densities. This mode is great for coins on edge or sitting at greater depths. It has a high trash rejection which makes it an ideal detect mode for areas containing coke.
Beach 1 provides a default MULTI-IQ transmit frequency and is optimised for dry and wet sand. Beach 1 mode has a lower recovery speed for better depth across all targets and is good for detecting coins and small to large jewellery.
Beach 2 provides a default MULTI-IQ transmit frequency and is optimised for underwater usage where a very strong salt signal is present. To compensate for the high salt content Beach 2 has a lower transmit power. Beach 2 can also be used in dry soils that have a high salt content.
Yes, there is no need to perform a full factory reset. Individual Search Profiles can easily be returned to their factory preset settings. Only the local settings will be reset and any global settings will remain in their last-use state.
Typical runtime, from a full charge using wired headphones, is approximately 12 hours. The X-TERRA ELITE detector can also be powered directly from any USB Power Bank that supports 0.5A or 2A (@ 5V) output capability. This effectively gives a continuous runtime only limited by the capacity of the power bank.
The X-TERRA ELITE detector supports charging from devices that comply to the USB 2.0 standard. QuickCharge™ is a proprietary standard develop by Qualcomm that uses a higher voltage and is not compatible with X-TERRA ELITE detectors.
The charge time, from completely flat to 100%, is approximately 4 hours when charged with a high capacity charger (>1.7A @ 5V).
Longevity for all batteries depends on a number of factors that are often controllable to some degree by the user; such as temperature, charge levels when stored, charge cycles etc. The most common cause of reduced life of Li-ION batteries is keeping a fully charged battery at elevated temperatures.
As with all components used in our detectors, we stringently source only modern high quality components from responsible vendors. We do not expect users to experience any battery issues over years of use. Our experience with the CTX 3030 and GPZ 7000 detectors which both use Li-ION batteries is that the vast majority of users have never needed to purchase a replacement battery.
Use only reputable and certified USB Chargers when charging the X-TERRA ELITE battery as detailed below:
The Li-ION battery contained in the handle is replaceable and covered under warranty for a period of 6 months from the date of purchase. Minelab recommends using an Authorised Service Centre to avoid potentially damaging the waterproof seal and voiding the detector warranty.
Yes, when detecting on land, without any limitations. However, the detector must not be used underwater whilst charging or when connected to a power bank.
Yes. If the detector is being used, when powered by a USB power bank, the battery may charge at a slower rate if there is enough spare capacity in the power bank.
Yes. Connecting the X-TERRA ELITE to a USB power bank will allow you to continue to use the detector even if the battery is low/flat. The power bank will charge the detector if there is any residue power to charge the battery.
예. 물속에서나 해변에서 감지한 후에는 깨끗하고 담수로 감지기를 세척하는 것이 좋습니다. 감지기를 청소할 때 연마제나 용제를 사용하지 마십시오.
탐지기를 수중 세척할 때마다 항상 제어 포드 후면의 플라스틱 마개가 헤드폰 잭에 나사로 단단히 고정되어 있는지 확인하십시오.
No. It is not necessary to lubricate or grease any part of the detector, including the waterproof seals. Using any petroleum-based grease will damage the waterproof seals and void the warranty.
If deep wading or fully submerged, we recommend using only Minelab Waterproof Headphones. These have a specially engineered connector that forms a waterproof seal when used with the X-TERRA ELITE.
VANQUISH depth performance is similar but not quite as deep as the EQUINOX. However, EQUINOX detectors are more configurable for varying conditions.
Minelab does not publish the exact frequencies of Multi-IQ technology used in the VANQUISH Series. These frequencies are similar to the Multi-IQ mode in the EQUINOX Series.
The VANQUISH Series detectors only use Multi-IQ (simultaneous multi-frequency) technology.
Target IDs on VANQUISH are the same as the Target IDs on EQUINOX.
Recovery speed varies depending on the mode selected.
The Custom mode is programmable. If you program custom mode, it will adopt the recovery speed from the mode you program it to, e.g. coin mode = fast recovery speed, jewellery = medium recovery speed, relic = slow recovery speed.
When the detector is switched off, discrimination patterns in coin, jewellery & relic modes are all reset. Custom mode will keep its saved discrimination pattern.
There are three coils available for VANQUISH. These are:
The VANQUISH Series requires x4 AA batteries and is compatible with both rechargeable and non-rechargeable batteries. The battery level indicator shows the current battery level. Lift the battery cover off the control box to replace the batteries.
The VANQUISH 540 and 540 Pro-Pack come with x4 AA NiMH rechargeable cells and a charger. The VANQUISH 340 and 440 can also operate with rechargeable batteries. Minelab recommends only NiMH rechargeable batteries or non-rechargeable AA alkaline batteries. Batteries rated between 1.2v – 1.5v are acceptable. If the battery has a voltage higher than 1.5v, it can damage the detector.
AA rechargeable NiMH batteries provide a run-time of approximately 11 hours using factory default settings.
Non-rechargeable, high-quality AA alkaline batteries provide a run-time of approximately 10 hours.
No. VANQUISH coils cannot be used on EQUINOX, and EQUINOX coils cannot be used on VANQUISH.
The VANQUISH control box is not submersible. The coils are fully waterproof up to 1 m (3 ft).
The temperature specification for the VANQUISH Series is -10C – 40 C (14F – 104 F). The coil is waterproof to 1 m (3 ft), but the control pod cannot be submerged.
No. Pitch or tone breakpoints cannot be adjusted on the VANQUISH Series.
The VANQUISH 540 has a red backlight for detecting in low light situations. The backlight is 'Off' by default at each start-up to reduce battery consumption.
The Multi-IQ technology used in VANQUISH allows the detector to provide stable and reliable target IDs in light of medium mineralised soils found in beaches or parks. As a result, there is no ground balance function available in the VANQUISH Series.
Multi-IQ technology allows VANQUISH to operate on wet beach sand and salt water with much higher performance than a single frequency VLF detector.
VANQUISH 540 can operate with Bluetooth V4.2 or later and Bluetooth aptX Low Latency headphones. VANQUISH 340 & 440 do not have wireless capability.
Yes. Software updates can be found on the Minelab website on the VANQUISH product page 'downloads' section.
VANQUISH Series detectors are under warranty for three years (36 months) from the Date of Purchase. Detailed product warranty information can be found under SUPPORT at minelab.com.
Including battery weight, the VANQUISH 340 and 440 weigh 1.2 kg (2.6 lbs), whereas VANQUISH 540 weighs 1.3 kg (2.9 lbs), as it includes the larger V12 coil.
VANQUISH 540 Pro-Pack contains the same VANQUISH 540 detector but includes the smaller V8 coil and the ML80 Bluetooth aptX Low Latency wireless headphones.
감지기를 끈 후 감지기를 다시 시작하기 전에 최소 2초 동안 기다리십시오.
Iron Bias 설정은 모든 VANQUISH 감지기의 모든 모드에서 동일합니다.
참고: VANQUISH 540에는 EQUINOX와 유사한 철 바이어스 응답을 갖는 조정 가능한 철 바이어스가 있습니다.
PRO-SWITCH technology is a single frequency VLF technology that allows the user to switch transmit frequencies at the touch of a button to optimise performance.
Changing frequency gives detectorists the ability to adjust frequencies to move away from noise or optimise detection ability when hunting for specific metal targets.
Park and Field modes have 5kHz, 10kHz and 15kHz selectable frequencies. Beach modes have an 8kHz single frequency for high salt mineralisation.
MULTI-IQ will provide superior results when compared to PRO-SWITCH. There may be situations where the PRO-SWITCH technology can perform equally as well as MULTI-IQ. This will depend on how the user has optimised the detector settings.
Multi-IQ will provide maximum performance in all situations as the internal processor does all the hard work. PRO-SWITCH relies on the user to ensure the detector is set to its optimal performance capability.
VANQUISH detectors with MULTI-IQ are a switch-on and go type detector designed to have excellent performance but still be very easy to use with minimal setting adjustments. This is possible as the MULTI-IQ processor does all the hard work for you.
X-TERRA PRO is a high performing single frequency detector designed for the more committed detectorist looking for a well-priced detector with great performance. Users have the ability to adjust transmit frequency which provides more control allowing detectorists to tune the detection performance when hunting for specific targets. The X-TERRA PRO is waterproof to 5 meters (15 feet) and provides superior performance when compared to any other single frequency detector currently on the market.
Target ID’s on the X-TERRA PRO will generally not be quite as stable as MULTI-IQ target ID’s and MULTI-IQ detectors will generally provide superior performance when in conductive (salty) soils.
The X-TERRA PRO comes with a V12X 12” Elliptical Double-D coil in the box, you can purchase the below accessory coils from your local Minelab dealership. Any coil that is compatible with the EQUINOX detectors is also compatible with the X-TERRA PRO.
10kHz is the best all-round frequency to start detecting with as it provides good depth and sensitivity across a range of different targets.
It is expected when running a lower transmit frequency on the X-TERRA PRO that performance on high conductors containing silver or copper will provide similar depths to MULTI-IQ detectors.
It is expected when running a higher transmit frequency on the X-TERRA PRO that performance on lower conductors containing gold will provide similar depths to MULTI-IQ detectors.
At the beach in salty conditions most single frequency detectors struggle with the mineralisation. The X-TERRA PRO provides unprecedented performance for a single frequency VLF detector in salty conditions.
Yes, there is no need to perform a full factory reset. Individual Search Profiles can easily be returned to their factory preset settings. Only the local settings will be reset and any global settings will remain in their last-use state.
Yes, you can purchase the Minelab ML85 headphones, ML105 headphones or the WM09 wireless module. These are all compatible with the X-TERRA PRO.
There are currently no aftermarket wireless headphones available for the X-TERRA PRO.
The X-TERRA PRO uses a proprietary wireless audio that is not compatible with any current versions of BLUETOOTH. The Minelab ML85 or ML105 headphones and WM09 wireless module are compatible with the X-TERRA PRO and are available from your local authorised Minelab dealership.
Park 1 provides a default 10kHz transmit frequency and is optimised for detecting modern coins and larger jewellery. This is a good mode to learn the X-TERRA PRO before experimenting with other settings.
Park 2 provides a default 15kHz transmit frequency and is optimised for detecting fine jewellery and smaller targets in trash infested areas. Recovery speed in Park 2 is increased to clearly identify good targets masked by iron trash.
Field 1 provides a default 10kHz transmit frequency and is optimised for detecting modern coins and general detecting. It has a high trash rejection which makes it an ideal detect mode for areas containing coke.
Field 2 provides a default 15kHz transmit frequency and is optimised for locations with high target and trash densities. This mode is great for coins on edge or sitting at greater depths. It has a high trash rejection which makes it an ideal detect mode for areas containing coke.
Beach 1 provides a default 8kHz transmit frequency and is optimised for dry and wet sand. Beach 1 mode has a lower recovery speed for better depth across all targets and is good for detecting coins and small to large jewellery.
Beach 2 provides a default 8kHz transmit frequency and is optimised for underwater usage where a very strong salt signal is present. To compensate for the high salt content Beach 2 has a lower transmit power. Beach 2 has a higher recovery speed to aid in saltwater rejection. It can also be used in dry soils that are conductive (salty).
Typical runtime, from a full charge using wired headphones, is approximately 16 hours. The X-TERRA PRO detector can also be powered directly from any USB Power Bank that supports 0.5A or 2A (@ 5V) output capability. This effectively gives a continuous runtime only limited by the capacity of the power bank.
The X-TERRA PRO detector supports charging from devices that comply to the USB 2.0 standard. QuickCharge™ is a proprietary standard develop by Qualcomm that uses a higher voltage and is not compatible with X-TERRA PRO detectors.
The charge time, from completely flat to 100%, is approximately 4 hours when charged with a high capacity charger (>1.7A @ 5V).
Longevity for all batteries depends on a number of factors that are often controllable to some degree by the user; such as temperature, charge levels when stored, charge cycles etc. The most common cause of reduced life of Li-ION batteries is keeping a fully charged battery at elevated temperatures.
As with all components used in our detectors, we stringently source only modern high quality components from responsible vendors. We do not expect users to experience any battery issues over years of use. Our experience with the CTX 3030 and GPZ 7000 detectors which both use Li-ION batteries is that the vast majority of users have never needed to purchase a replacement battery.
Use only reputable and certified USB Chargers when charging the X-TERRA PRO battery as detailed below:
핸들에 포함된 리튬 이온 배터리는 교체가 가능하며 보증 기간이 적용됩니다. 구입일로부터 6 개월. Minelab에서는 방수 씰의 손상 가능성과 감지기 보증 무효화를 방지하기 위해 공인 서비스 센터를 이용할 것을 권장합니다.
Yes, when detecting on land, without any limitations. However, the detector must not be used underwater whilst charging or when connected to a power bank.
Yes. If the detector is being used, when powered by a USB power bank, the battery may charge at a slower rate if there is enough spare capacity in the power bank.
Yes. It is good practice to wash the detector with clean fresh water after detecting in water or on the beach. Never use abrasives or solvents to clean the detector.
Whenever washing or using your detector underwater always ensure that the plastic bung on the rear of the control pod is firmly screwed into the headphone jack.
No. It is not necessary to lubricate or grease any part of the detector, including the waterproof seals. Using any petroleum-based grease will damage the waterproof seals and void the warranty.
If deep wading or fully submerged, we recommend using only Minelab Waterproof Headphones. These have a specially engineered connector that forms a waterproof seal when used with the X-TERRA PRO. These headphones are available as an accessory (Part Number: 3011-0372)
No, the detection coil that is included with your GO-FIND detector is designed to provide the best performance for that specific model and cannot be changed.
The battery compartment is in the handle of the GO-FIND. On the rear of the handle, you will see a small tab. Gently pull this tab down and then lift the battery compartment lid to access the batteries.
Yes, the GO-FIND series can operate with rechargeable 1.2volt Ni-MH rechargeable batteries. You can only use batteries that have a 1.2 volt or 1.5volt rating. Most AA Lithium batteries have a higher voltage and cannot be used as they exceed the maximum voltage rating for the detector. Using Lithium batteries that exceed the maximum voltage rating can damage the internal electronics of the detector. This type of damage is not covered under warranty.
The detection coil on the GO-FIND series is waterproof to 60cm (2ft) and can be washed. The screen pod should never be washed or submerged in water as it is not waterproof. To clean the screen pod wipe it with a damp cloth.
Yes, the GO-FIND detectors utilise Minelab’s Easy-Trak ground balance technology which automatically senses salt mineralisation in the ground and adjusts the detector to ensure constant smooth usage when detecting in beaches or parks.
Wireless headphones can be used but they cannot be paired directly to your detector. You will need to connect your wireless headphones to your smartphone and then connect your GO-FIND 44 or 66 to your smartphone via the GO-FIND app. GO-FIND 11 or 22 do not have Bluetooth capability and cannot connect to the GO-FIND app or wireless headphones.

In your Android phone Google Play Store & Apple iPhone App Store Search for Minelab GO-FIND
GO-FIND by Minelab Electronics Pty Ltd will be 1st – 2nd in search result.
The Pro App function is FREE for GO-FIND 66 detectors. Download the same GO-FIND App for FREE. When this GO-FIND App is paired with a GO-FIND 66, the App will activate full Pro App functions.
Download the same GO-FIND App for FREE. When this GO-FIND App is paired with a GO-FIND 44, the App will activate basic App functions.
Download the same GO-FIND App for FREE. When this GO-FIND App is paired with a GO-FIND 44, the App will activate basic App functions. It is optional to upgrade your Basic App functions to Pro App functions, just like how it used on a GO-FIND 66. In-app purchase is available for upgrading.
For the first time use, you need to pair GO-FIND 44/66 with your mobile device:
See also:
In GO-FIND App, the is help (?) button on the bottom right corner. Click to view Bluetooth pairing guide and Bluetooth connection guide.
No, after the pairing for the first time use. Your next time use should just require a short press to turn on Bluetooth function.
You can now use App with the detector
Android 11 or later with Bluetooth Lower Energy hardware
iPhone iOS 8.0 or later with Bluetooth Lower Energy hardware
No, the X-TERRA VOYAGER uses different technology to other detectors. You can only use the coil that is supplied in the box with the detector.
The X-TERRA VOYAGER does not have any accessory coils currently available.
The depth gauge will provide an approximate indication of depth and should only be used as a guide as large or small metals will cause the gauge to become inaccurate. A coin sized object will provide the below estimated depths.
1 arrow = 1” (25mm)
2 arrows = 3” (75mm)
3 arrows = 5” (125mm)
4 arrows = 6” (150mm)
5 arrows = >6” (>150mm)
The X-TERRA VOYAGER does not have wireless capability. You can use a Bluetooth wireless transmit module with the detector. These are not available from Minelab and will have to be purchased separately.
All Metal allows the detector to detect all metal types. When in all metal mode there will be no discrimination of any metal types.
Custom provides users the ability to discriminate any of the target group icons at the top of the screen. You simply navigate through to the desired target group and the icon will flash for a few seconds and then it will disappear. All target ID’s in this target group will now be discriminated out.
To detect the discriminated target group simply navigate away from the target group and then navigate back to the desired target group. The icon will flash for a few seconds and then appear. All target ID’s in the target group will now detect again.
Jewelry provides discrimination pattern that ignores most iron/ferrous junk. You will also find coins, relics and other non-ferrous metals. This mode is good for trashy environments.
Learn allows users to detect 1 specific target group. You simply need to wave the desired metal over the detection coil, the detector will then learn this target ID and accept only targets ID’s within that target group.
Typical runtime, when using new high quality 9-volt alkaline batteries is 20 hours.
It is good practice to clean your detector after each use. Only fresh water should be used when cleaning. Never use abrasives or solvents to clean the detector. The detection coil is waterproof and can be washed with the hose. The Screen pod should only be carefully wiped with a clean damp cloth to avoid any water or moisture ingress.
No. It is not necessary to lubricate or grease any part of the detector. Using any petroleum-based grease can damage the plastics and void the warranty.
To disable the audio tones, you simply need to push and hold the "minus" button when powering the PRO-FIND 40 on.
To enable the audio tones, you simply need to push and hold the "plus" button when powering the PRO-FIND 40 on.
To disable the ferrous tones OFF simply push and hold the "minus" button when the PRO-FIND 40 is powered on and then wait for the long beep.
To enable the ferrous tones ON simply push and hold the "plus" button when the PRO-FIND 40 is powered on and then wait for the long beep.
No, the LED flashlight cannot be adjusted.
No, the vibration cannot be toggled ON/OFF.
The Rapid Re-tune feature was designed so that users do not have to power cycle the pin-pointers to re-tune the PRO-FIND to the environment.
To re-tune the PRO-FIND 40 simply short-press the power button when the PRO-FIND 40 is powered on.
At maximum Sensitivity the PRO-FIND 40 can detect targets at greater distances which can be both an advantage and a disadvantage. To pinpoint a target sometimes it’s better to have a less sensitive probe to reduce the search area, so we have given you the ability to adjust it how you see fit. The Sensitivity may also need to be reduced in mineralised or salty soils, so that you are only detecting metal and not the minerals in the ground.
Side detection occurring with the target (or multiple) in the side of the hole. Use the tip of the probe to check around the sides of the hole. Reducing the Sensitivity can also help.
Yes, but be aware that the PRO-FIND 40 won’t have the same sensitivity to very small nuggets as a quality Minelab metal detector. It will be a good aid in target recovery for larger nuggets.
Yes, the PRO-FIND 40 is waterproof to 3 meters (10ft) and can be washed. When washing always use clean fresh water.
If no targets are detected or buttons pressed for 5 minutes, then the PRO-FIND 40 will start a slow constant beep (Lost Alarm) this alarm will sound for 5 minutes and then the PRO-FIND 40 will power off to save battery life.
The battery may be flat or inserted incorrectly. Replace the battery and/or check the battery orientation. If you are still having issues, contact your closest Minelab Service Centre.
The PRO-FIND 40 has a 3rd beep that notifies you that the pin-pointer has calibrated to the environment. This can sometimes take up to 30 seconds to occur depending on environmental conditions. You can short press the power button to perform a rapid re-tune. You should then hear a confirmation beep and the PRO-FIND 40 should now detect metals.
Tips for switching on:
*Calibration usually takes less than a second when the unit has been used recently.*
In highly mineralised soils:
대상이 감지되지 않거나 몇 분 동안 버튼을 누르면 장치에서 알람이 울리기 시작하여 긴 신호음이 울리므로 핀 포인터를 찾을 수 있습니다. 몇 분 후 배터리 수명을 유지하기 위해 핀 포인터가 자동으로 꺼집니다.
구멍을 파고 땅에 남겨두면 장치를 찾을 수 있습니다. 진동 전용 모드 인 경우 경고음이 발생하지 않습니다. 5 분 동안 느린 경고음이 울리면 기기가 자동으로 꺼집니다.
뚜껑이 켜지면 배터리가 잘못된 방식으로 삽입되어있을 수 있지만 조이기는 어렵습니다. 열쇠 형 플라스틱은 배터리 탭이 접점에 닿지 않도록합니다. 배터리를 돌려서이 문제를 해결하십시오.
Pro-Find를 켜면 2 번의 삐 소리가 나고 3 번 더 짧은 삐 소리가납니다. 이 교정은 때때로 15-20 초가 소요될 수 있습니다. Pro-Find를 금속 물체 근처에두기 전에이 교정 경고음이 발생할 때까지 기다리십시오. 스위치를 켤 때 금속 근처에 Pro-Find가 있으면 보정되지 않으며 Pro-Find를 다시 시작해야합니다.
구멍의 측면에서 대상 (또는 여러 개)으로 발생하는 측면 감지 구멍 끝을 확인하기 위해 프로브의 끝을 사용하십시오. 감도를 줄이는 것도 도움이 될 수 있습니다.
예, 그러나 품질이 우수한 Minelab Gold Detector와 같은 초소형 덩어리에 대해 동일한 감도를 갖지 않습니다. 더 큰 덩어리의 대상 복구에 도움이 될 것입니다.
최대 감도에서 PRO-FIND 35는 장거리에서 대상을 감지 할 수있어 장단점이 될 수 있습니다. 때때로 대상을 정확히 찾아 내려면 검색 영역을 줄이기 위해 덜 민감한 프로브를 사용하는 것이 좋습니다. 따라서 원하는대로 조정하는 기능을 제공했습니다. 광물성 또는 짠 토양에서는 감도를 줄여야 만 땅이 아닌 금속 만 감지 할 수 있습니다.
PRO-FIND 35는 3 미터까지 완벽하게 방수되므로 핀 포인터를 물에 담그면 청소할 수 있습니다. 핀 포인터를 담그기 전에 배터리 캡이 완전히 조여져 있는지 확인하십시오.
PRO-FIND 15는 방수 기능 만 있습니다. 엄지 손가락으로 스피커 통풍구를 막 으면 흐르는 물로 씻을 수 있습니다.
켜기 팁 :
기기를 최근에 사용한 경우 일반적으로 교정에 1 초 미만
고도로 광물 화 된 토양에서 :
오디오 켜기 및 끄기 (Pro-Find 35 만 해당) :
철음 켜짐 및 꺼짐 (Pro-Find 35 만 해당) :
CTX 3030, GPZ 7000 및 XChange 2는 모두 데이터 저장을 위해 SQLite를 사용합니다. SQLiteSpy 와 같은 도구를 사용하면 파일을 추출하는 데 도움이 될 수 있습니다. 추출된 파일이 직접 실행되므로 SQLiteSpy를 설치할 필요가 없습니다.
1. 탐지기를 PC에 연결하고 생성된 새 이동식 드라이브로 이동합니다.

2. 드라이브를 엽니다.

3. 내부에 파일이 있습니다. 이것을 사용할 위치에 복사하십시오. 이 파일은 열어야 하는 저장소 데이터베이스입니다.
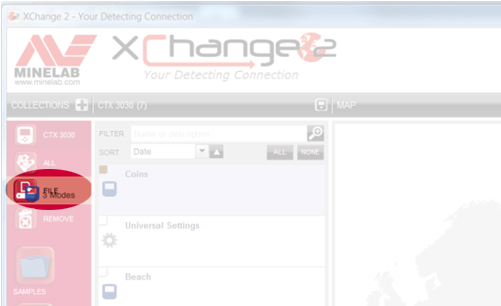
1. XChange 2에서 추출하려는 포인트를 선택하십시오.
2. "파일"폴더로 드래그합니다.

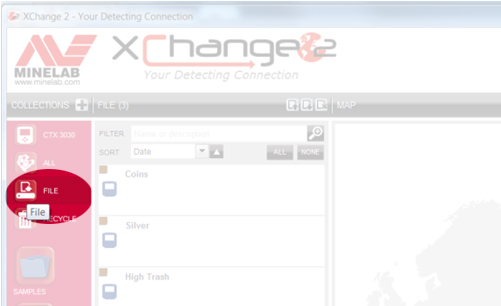
3. '파일'폴더를 클릭하여 엽니 다.
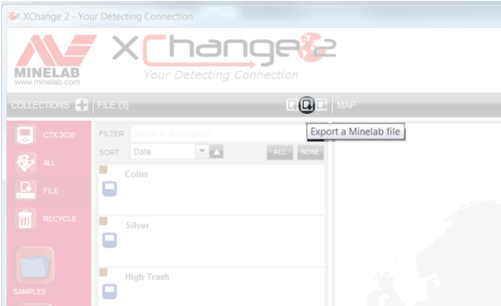
4. 'Minelab 파일 내보내기'버튼을 클릭합니다.

5. 파일은 '다운로드'폴더에 있어야합니다.
6. 다운로드 한이 파일은 압축되어 있으므로 7zip과 같은 도구를 사용하여 내부의 'shareData'파일을 추출해야합니다.
7. 'shareData'를 사용할 위치에 복사합니다. 이 파일은 열어야하는 스토리지 데이터베이스에 있습니다.
이 예제에서는 SQLiteSpy가 사용되지만 다른 도구에도 적용되는 유사한 프로세스입니다.
1. SQLiteSpy 열기
2. '파일'> '데이터베이스 열기 ...'를 선택하십시오.

3. 데이터베이스 위치로 이동합니다.
4. 파일 형식을 '모든 파일 (*. *)'로 변경합니다.

5. 데이터베이스를 선택하고 '열기'를 선택합니다.
6. 왼쪽에는 사용 된 데이터베이스 파일에 따라 여러 테이블이 있습니다.
ㅏ. "findpoint": 여기에는 저장된 각 FindPoint가 포함됩니다.
비. "waypoint": 여기에는 저장된 각 WayPoint가 포함됩니다.
씨. "point": 여기에는 모든 GeoHunt에서 트랙을 만드는 데 사용되는 각 지점이 포함됩니다. 각 GeoHunt는 "geohunt_fk"열에서 UUID로 식별됩니다.
디. "geohunt": 여기에는 "points"테이블에서 각 GeoHunt를 식별하는 데 사용되는 UUID가 포함됩니다.

7. 또한 일부 FindPoint를 추출한다고 가정합니다 (다른 포인트에도 동일한 절차가 사용됨).
8. "findpoint"테이블을 더블 클릭합니다. 추출 된 모든 FindPoint가 표시됩니다.
9. 테이블의 행을 클릭 한 다음 "Ctrl + A"키를 눌러 모든 행을 선택합니다.
10. "Ctrl + C"키를 눌러 모든 데이터를 복사합니다.
11. 엑셀 열기
12. 데이터를 스프레드 시트에 붙여 넣습니다.
13. 일부 데이터베이스 파일에서는 위도와 경도를 10,000,000으로 나누어 올바른 형식으로 사용해야합니다.
14. 여기에서 포인트로 필요한 작업을 수행하십시오.


